
Blocking it Out
Today's topic: BLOCKING
I'm not talking about blocking those telemarketers repeat phone calls, or building wooden towers with your little ones. I'm talking about the kind done to make your crochet work look fabulous! I mean, seriously professional vs. lumpy and amateurish. Do you ever wonder why your finished piece doesn't look like the one in that picture on the front of the pattern? It might just be because of BLOCKING!


Let's start with some squares. Since I'm all about motifs, and buttons, I thought these from my Bright as a Button Blanket might
do just the trick for a demo.
They don't look so bad, really.

Well, a little bad. But I could tug on them a bit, right? Maybe they'll look better when I get them all joined together. But what if they don't?


These pins are nickel-plated and I have used them a LOT and never had a problem. You decide if the risk is worth it. :)
Now, where to pin your piece...??
My favorite place is an ironing board! Why?
~It is a convenient height.
~It holds pins firmly.
~It is large enough to pin quite a few motifs at once--
since I often put this off until the end of my project.
~It can be moved as needed while your pieces are drying.
~It can easily be covered with a pillow case (see below).
Why would you bother to cover your ironing board if it is already covered? It's simply another level of protection for your crocheted work. I know my ironing board cover sometimes has starch, water stains, etc. that I don't want to transfer onto my yarny beauty!! And an old pillowcase is the perfect width. When cut up each seam, it extends out to cover the entire board.


Plus, it has some other terrific options...
If you use a plaid one like this, the lines on the case help you to "square" your squares.

Or a dotty one like this can help in a similar way.

I have even marked gridlines on my cut pillow case with a permanent marker. I typically mark lines an inch apart and that way I don't have to measure each motif with a measuring tape and can make them all say, "6 inches" at a glance.


When they are dry after blocking, the fibers are more relaxed, the shape is crisp, the stitches are defined. You are on your way to a professional looking piece. See how much better than before?

 Keep in mind that these sample squares are made with Red Heart Soft acrylic yarn which is an ideal fiber for wet-blocking, but you can use this technique with other fibers, too. And there are other blocking methods out there. This is just my go-to favorite.

Now, what if you made a baby blanket or afghan--say, not with motifs or worked join-as-you-go--and it has a wonky border or just doesn't seem "square"? I've blocked finished blankets on my ironing board, as well. It is a little less precise and needs to be done in sections, but is still do-able. Hey, we crocheters are creative, right?
Give blocking a go--I think you'll be pleased with the results. Then pass it on to your other hooky friends so they can be impressed, too!!
This blog entry is my submission to the Deramores Blog Awards 2014. Deramores is the UK’s number one online retailer of knitting and crochet supplies. www.deramores.com/blog-awards
| On the Board | -- A thankful heart is the parent of all virtues.

I'm not talking about blocking those telemarketers repeat phone calls, or building wooden towers with your little ones. I'm talking about the kind done to make your crochet work look fabulous! I mean, seriously professional vs. lumpy and amateurish. Do you ever wonder why your finished piece doesn't look like the one in that picture on the front of the pattern? It might just be because of BLOCKING!


Let's start with some squares. Since I'm all about motifs, and buttons, I thought these from my Bright as a Button Blanket might
do just the trick for a demo.
They don't look so bad, really.

Well, a little bad. But I could tug on them a bit, right? Maybe they'll look better when I get them all joined together. But what if they don't?

This is easy peasy to solve. Here's my method for wet-blocking...
Stuff you'll need to gather:
~Spray bottle with water (for misting your pieces)
~Ironing board
~Old pillow case cut up the side seams
~Rust-proof or rust-resistant pins
Note: Those pins really do need to be rust-proof or at a minimum rust-RESISTANT, because you REALLY don't want little rust spots messing up your hours of hard work. Stainless steel or brass is rust-PROOF. Nickel-plated are rust-RESISTANT. But what if you have pins sitting around and you don't know what they are. Hint: If they don't stick to a magnet, they are probably stainless steel and good to go. Otherwise, you might want to make a trip to the store to be certain.

These pins are nickel-plated and I have used them a LOT and never had a problem. You decide if the risk is worth it. :)
Now, where to pin your piece...??
My favorite place is an ironing board! Why?
~It is a convenient height.
~It holds pins firmly.
~It is large enough to pin quite a few motifs at once--
since I often put this off until the end of my project.
~It can be moved as needed while your pieces are drying.
~It can easily be covered with a pillow case (see below).
Why would you bother to cover your ironing board if it is already covered? It's simply another level of protection for your crocheted work. I know my ironing board cover sometimes has starch, water stains, etc. that I don't want to transfer onto my yarny beauty!! And an old pillowcase is the perfect width. When cut up each seam, it extends out to cover the entire board.


Plus, it has some other terrific options...
If you use a plaid one like this, the lines on the case help you to "square" your squares.

Or a dotty one like this can help in a similar way.

I have even marked gridlines on my cut pillow case with a permanent marker. I typically mark lines an inch apart and that way I don't have to measure each motif with a measuring tape and can make them all say, "6 inches" at a glance.


Now get those little beauties pinned down. Use as many pins as you need to hold it in place. If you spray them slightly before pinning, that yarn will get stretchier and more willing to shape. Then spray again lightly, if needed. You don't want them drippy and soggy. Just damp.
Next step...don't move them until they are completely dry. That part's easy.

When they are dry after blocking, the fibers are more relaxed, the shape is crisp, the stitches are defined. You are on your way to a professional looking piece. See how much better than before?


Now, what if you made a baby blanket or afghan--say, not with motifs or worked join-as-you-go--and it has a wonky border or just doesn't seem "square"? I've blocked finished blankets on my ironing board, as well. It is a little less precise and needs to be done in sections, but is still do-able. Hey, we crocheters are creative, right?
Give blocking a go--I think you'll be pleased with the results. Then pass it on to your other hooky friends so they can be impressed, too!!
This blog entry is my submission to the Deramores Blog Awards 2014. Deramores is the UK’s number one online retailer of knitting and crochet supplies. www.deramores.com/blog-awards
| On the Board | -- A thankful heart is the parent of all virtues.
~ Dieter F. Uchtdorf

Related Posts
It's a Beautiful Day for a WIP
I've lived a really abundant life-- a life full of opportunity, experience, love and growth. Some of it has been hard...
Read More
Under the Awning Blanket Crochet Pattern Update
I suppose it happens. I must accept change. I'm not talking about changes like my kids growing up, or the crows feet ...
Read More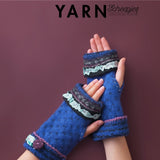
YARN 8 Book-a-Zine: How to Make Felted Mitts
Ever since discovering the magic of felting, I'm honestly gleeful when I get to create anything with the technique. R...
Read More