
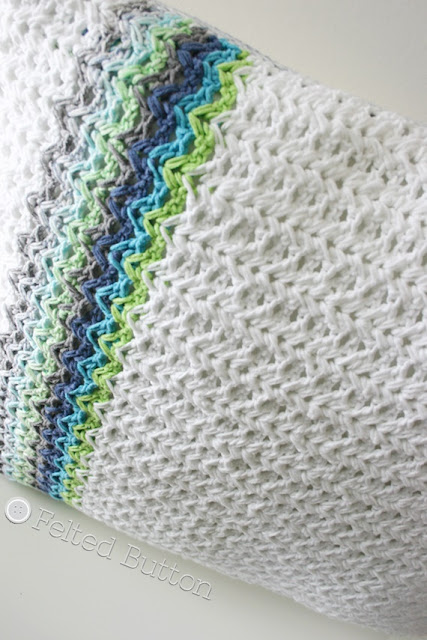
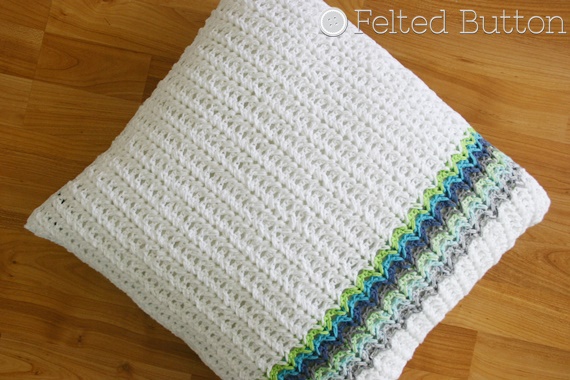
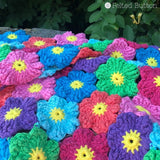
Herringbone Crochet Pillow Stitch
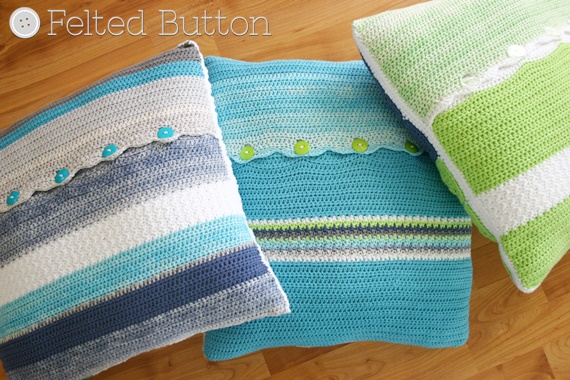
Recently I shared pictures of a set of three graphic pillow covers that I designed. The set will be released as a single crochet pattern which includes all three pillows--and instructions to make a pillow back--made with the fabulous Scheepjes Softfun and Softfun Aquarel yarns. Have I ever told you how much I love Scheepjes yarn? Oh, yes, you can read more about that fact here. And rest assured, the pattern will be available very soon!

If you want to make sure not to miss your chance to get your hook into the full pattern, subscribe to my newsletter in the upper right of my sidebar. Or you can follow me on Instagram (@FeltedButton) or Facebook here.
Today I wanted to share the stitch pattern for completing this pillow...


If you want to make sure not to miss your chance to get your hook into the full pattern, subscribe to my newsletter in the upper right of my sidebar. Or you can follow me on Instagram (@FeltedButton) or Facebook here.
Today I wanted to share the stitch pattern for completing this pillow...
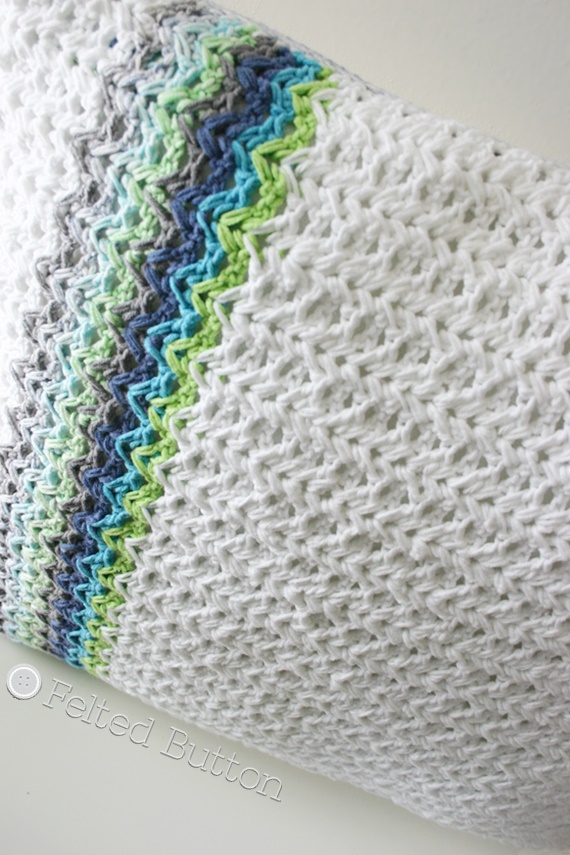
I'm calling it Herringbone because of the zig-zagged and intertwined nature of the stitches. I really love the texture and ability to have some serious fun with color. It's not a hard stitch at all, but does require a little interesting stitch placement.
So, are you ready?
Here we go...
Materials:
~2 skeins White (#2412-A)
~1 skein each of Green, Turquoise, Navy, Grey (#2516-I, #2423-H, #2489-G, #2510-F)
Scheepjes Softfun Aquarel
~1 skein each of Heathered Green, Turquoise, Navy, Grey (#808-E, #801-D, #802-C, #806-B)
~G (4mm) Hook
~1 skein each of Green, Turquoise, Navy, Grey (#2516-I, #2423-H, #2489-G, #2510-F)
Scheepjes Softfun Aquarel
~1 skein each of Heathered Green, Turquoise, Navy, Grey (#808-E, #801-D, #802-C, #806-B)
~G (4mm) Hook
~Pillow Form--20" (50cm) square
Dimensions/Gauge:
I made my pillow cover to fit a 20" (51cm) square pillow. The pillow cover was designed with 1" (2cm) negative ease. If you want to change up your dimensions, you can use the multiple number of 4 + 3. Just chain to your desired width in multiples of 4 and then add 3 more. Work the repeat rows to your desired height. My gauge for the sample pillow was 10 rows X 4 shells = 4" (10cm) following the pattern.
Stitches used (US Terms):
ch(s)=chain(s)
dc=double crochet
rep=repeat
sl st=slip stitch
sk=skip
sp=space
st=stitch
Special Stitch:
shell--(2 dc, ch 2, 2 dc) in indicated st or sp
Herringbone Pattern:
With A, ch 79
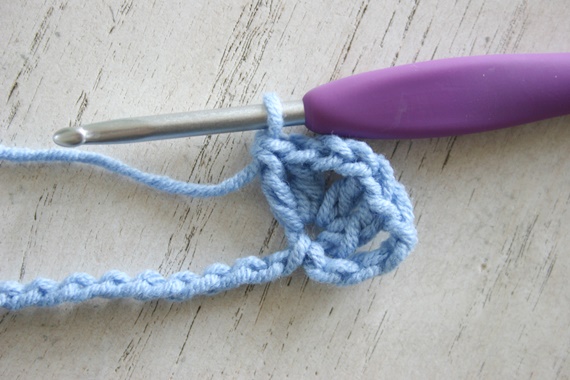
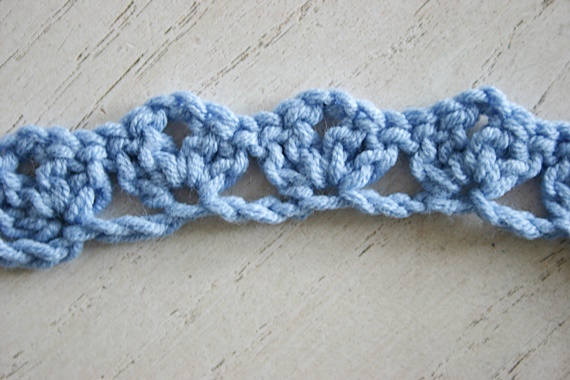
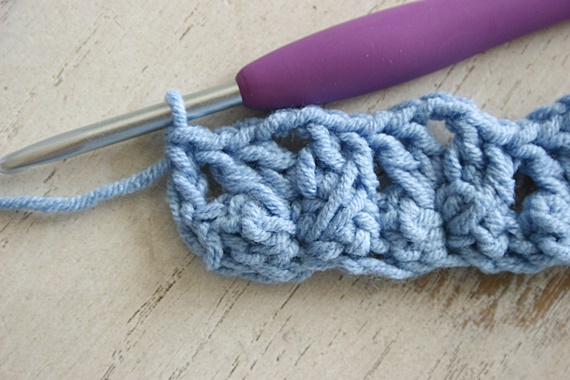
Row 1 (RS): shell (see Special Stitch) in 5th ch from hook, (sk next 3 chs, shell in next ch) across to last 2 chs, sk next ch, dc in last ch, turn --19 shells and 2x1 dc

This shows the first shell in the 5th ch from the hook. Remember, the shell is made with (2 dc, ch 2, 2 dc).
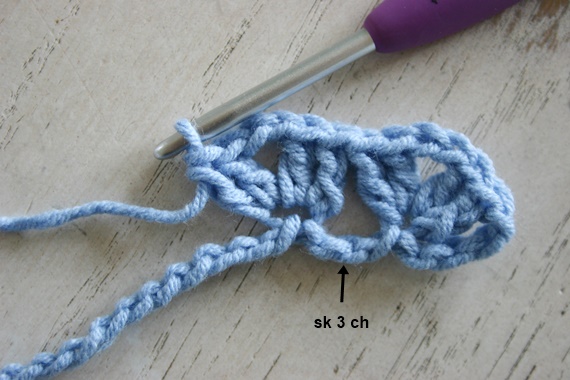
Skip 3 chs before working the next shell in your foundation.

Don't be worried about the "bend" you get in Row 1. There are a lot of stitches there but things pull together after the next row and straighten out.
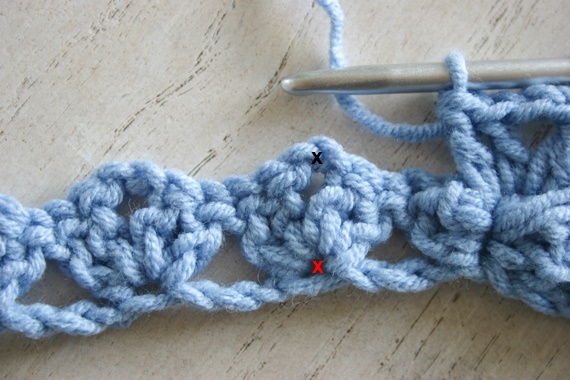
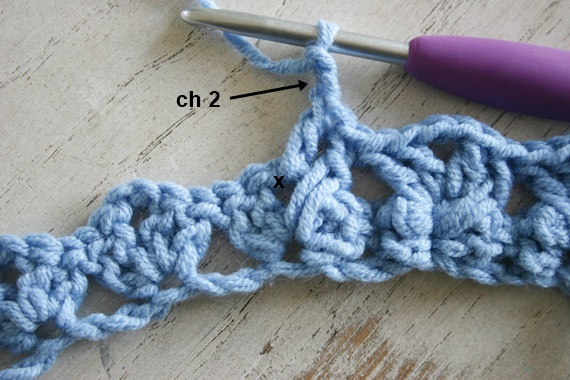
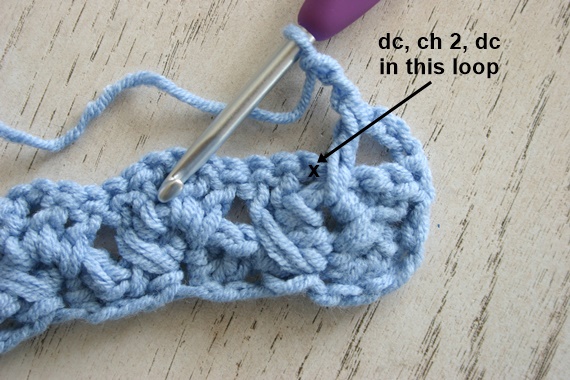
Row 2: ch 3 (counts as dc), *[working over ch-2 loop of last row, dc in same foundation ch as next shell drawing up long loop to height of working row, (dc, ch 2, dc) in ch-2 sp of same shell, working over ch-2 loop of last row, dc in base of same shell drawing up long loop to height of working row] across, ending with dc in top of turning ch, turn

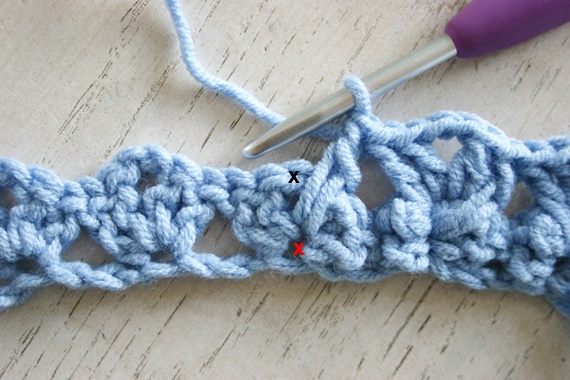
The trickiest part about this whole stitch pattern is the stitch placement. For Row 2 you will be putting your hook first where the red X is shown. This is the same place where your shell from Row 1 was worked. Then work (dc, ch 2, dc) in the ch-2 sp marked by the black X. Finally, working over the previous row again, place another dc in the same place as your first dc of this "shell"--the red X again.
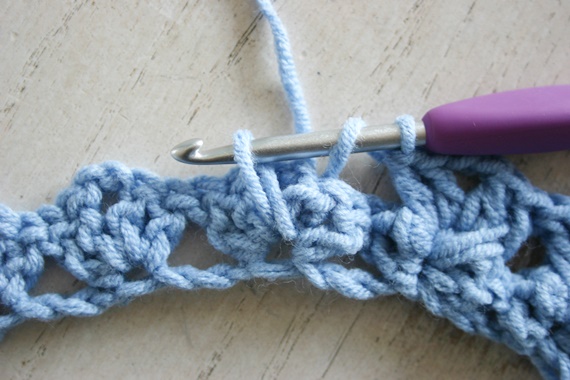
Let me show you. This is the start of a dc (remember loooong loop) in the red X space of the foundation ch.

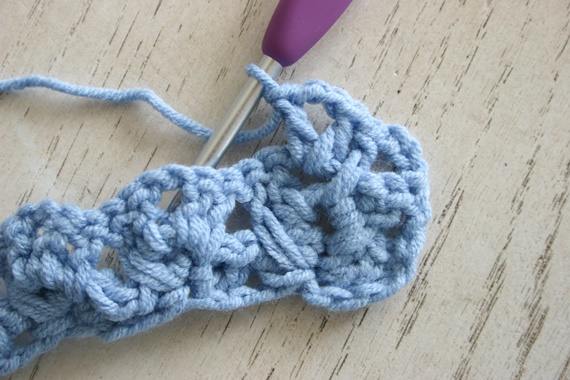
First dc done. Now work (dc, ch 2, dc) under the loop (ch-2 sp) marked by the black X.
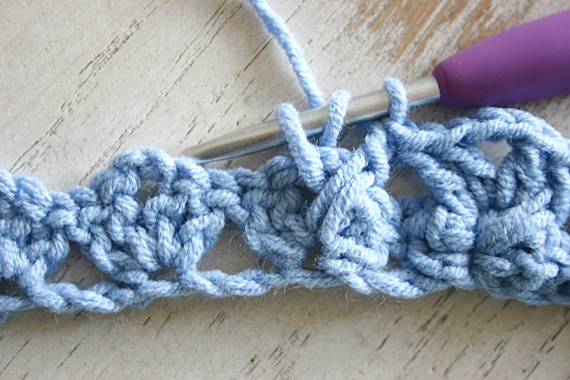
Now you'll work another dc in the space marked by the red X again.

And do this to the end of the row. When you have completed working over your last shell, complete a dc in the turning ch.
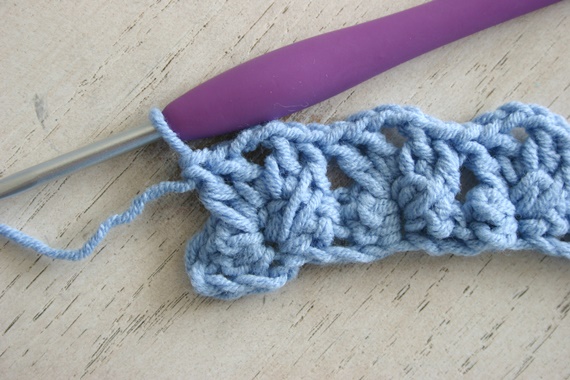
And turn your work. On to Row 3...
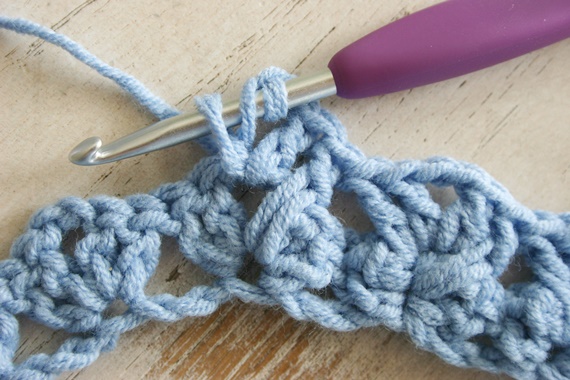
Row 3: ch 3 (counts as dc), [dc in ch-sp of next ch-2 sp on row before last, drawing up long loop to height of working row, (dc, ch 2, dc) in next ch-2 sp on last row, dc in same ch-sp on row before last, drawing up long loop to height of working row] across, ending with dc in top of turning ch, turn

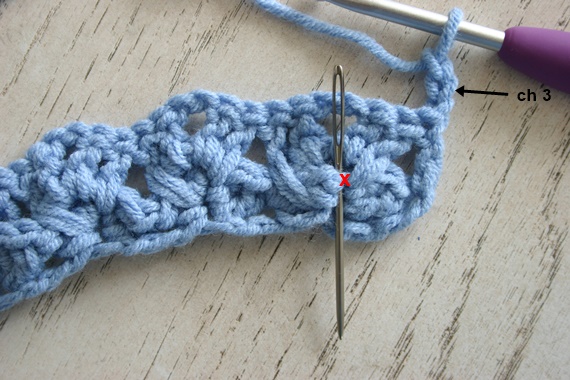
Ch 3 (which counts as a dc). Now you will be working over the last row and into Row 1. The loop marked by the red X with the needle inserted is where you will put your hook for the next dc.
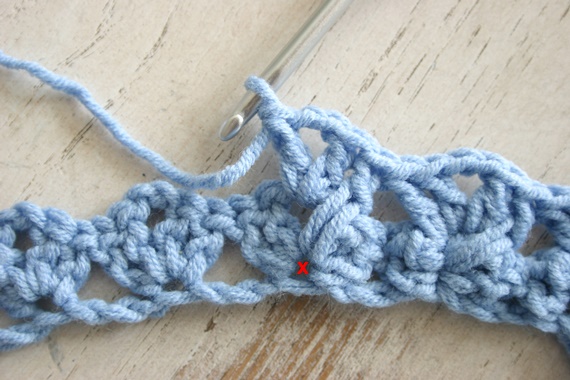
Then work (dc, ch 2, dc) under the ch-2 sp marked by the black X.
Now placing another dc where that first dc of the shell went completes the first herringbone "shell".
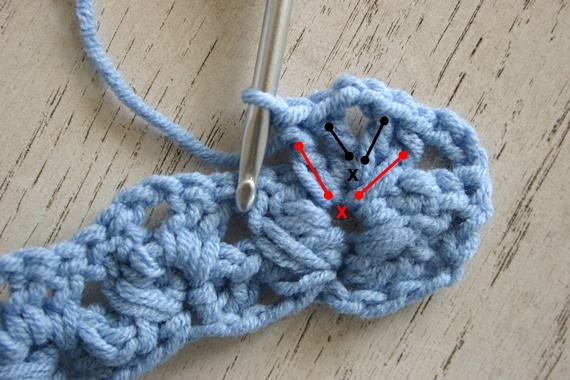
So deconstructing the first "shell", notice the placement of each of the stitches. This is essentially what you'll be doing for each row from here on.
Rep Row 3 until A is approximately 3" (7.5cm) high, changing to the next color at the end of the row. To change colors, work the last stitch of the row to the final two loops on the hook, draw up a loop with the new color and complete the stitch. Fasten off the old color. Rep Row 3 changing color at the end of each row through color sequence C-I and then changing to A at the end of color I row. Continue with A until the piece measures approximately 19" (48cm) high. Fasten off and weave in ends.

I hope you like this stitch pattern. I think it is really pretty, versatile and simple once you get the hang of where that hook goes.
What you have found here is enough to make a beautiful pillow front--or afghan, or lovey, or dishcloth, or cowl, or scarf or anything using this pretty stitch pattern. Make a second one as the back of the pillow, or use fabric, or even simple rows in the same dimensions. Sew them together and ta-dah!
The Taking Shape Pillow pattern includes instructions for making a removable buttoned back, and you will get the other two pillows included in the pattern purchase.

I hope you enjoyed this little tutorial and pillow pattern. I would love to see what you make with it, so feel free to share on my social media platforms or upload your project to Ravelry.
I'll be back soon with the pattern for the Taking Shape Pillow Set, a new blanket pattern that just returned from testers, and a new colorful free pattern made from the amazingly colorful Scheepjes Catona.
| On the Board | -- Believe in miracles. I have seen so many of them come even when every other indication would say that hope was lost. Hope is NEVER lost.
~~Jeffrey R. Holland
*In the spirit of full disclosure, this post includes affiliate links, which means that I may get a commission if you decide to purchase anything through the link. I only recommend products & systems that I use and love myself, so I know you’ll be in good hands.
Related Posts
Waikiki Wildflower Blanket Pattern Anew
When I contemplate the beginnings of Felted Button, one of my fondest memories is the creation of my Waikiki Wildflow...
Read More
Prism Blanket Make-a-Long MAL
I'm thrilled to be announcing something that's been in the works for quite some time now...
So what's a Scheepjes ...
Read More
Riverstone Asanas -- Updated Blanket Pattern
One of the most gratifying things about designing crochet patterns is seeing what people are able to do with my patte...
Read More