
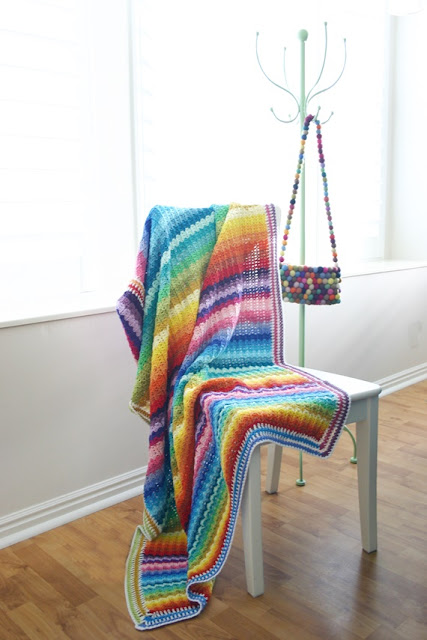
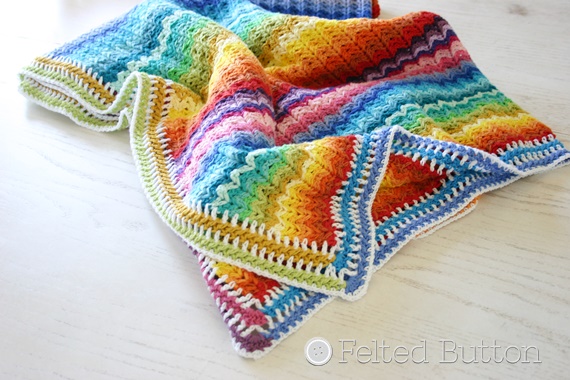
Illuminations Blanket Free Crochet Pattern
I'm so excited to be sharing another free crochet blanket pattern with you! If you follow me around on Facebook or Instagram (@FeltedButton) you might have seen some peeks at it or the complete reveal last week here, but I'm happy to share the pattern with you today. Introducing...

Materials:
Yarn: *Scheepjes Cotton 8 in the following color sequence: (Note: If you want fewer colors or to make your blanket slightly larger, there was about 65m/71yds of each color, except for a bit less of those used in the border, left over. The sample blanket's total yarn requirement was about 3400yds/3108m.)
Hook: 3.5mm (F) hook
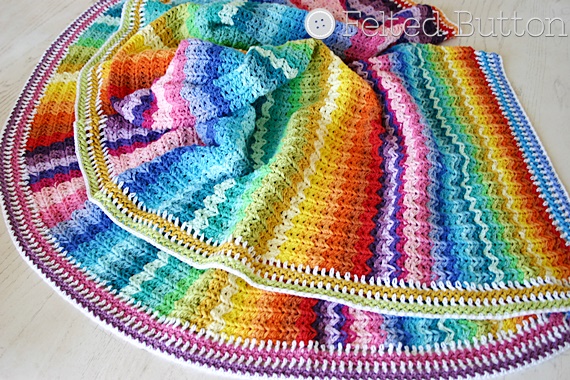
Dimensions with border: 44in x 59in (112cm x 150cm)
(Note: If you want to change up your dimensions, you can use the multiple number of 4 + 3. Just chain to your desired width in multiples of 4 and then add 3 more. Work the repeat rows to your desired height.)
Stitch Abbreviations (in US terms):
dc = double crochet
st = stitch
sk = skip
ch = chain
sp(s) = space(s)
sl st = slip stitch
rep = repeat
Rnd(s) = Round(s)
Cl = 2-dc Cluster (see Special Stitches)


Now work a half-closed dc in the same sp by yarning over, inserting your hook in the ch-3 corner sp, yarning over and drawing through a loop. Then yarn over again and draw through 2 loops on your hook. This leaves just 2 loops as shown above--a half-closed dc.
Now skip a ch-1 sp and work your second half-closed dc in the next ch-1 sp. Yarn over and draw through all three loops on your hook...

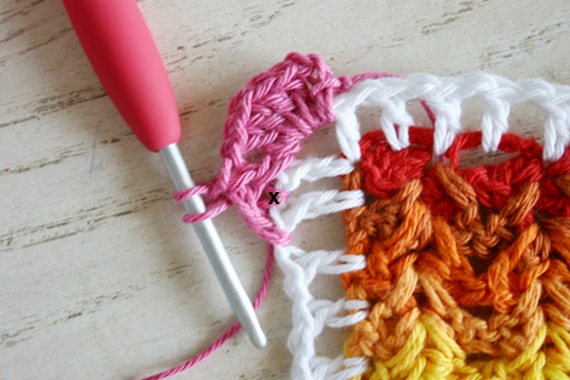
...to close the Cl (marked by the x). Ch 1.

Working behind the Cl just worked, work the first half-closed dc (marked by the x above) in the skipped--or previous--ch-1 sp.
Then work the second half-closed dc in the next ch-1 sp. Yarn over and draw through 3 loops to complete that Cl.

Ch 1. (These ch-1 sps are where your stitches for the next round will go.)

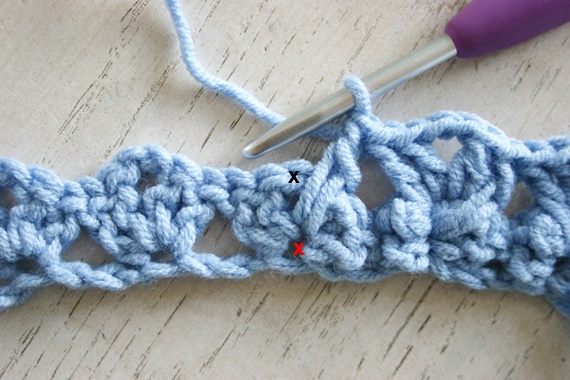
To give you a little better look at where your stitch goes when you work behind the previous "leg" of the Cl, The black X is the second "leg" of the Cl two stitches before. The blue X is the second "leg" of the previous Cl. Your stitch goes in the same ch-1 sp just before the black X. In essence, your clusters are straddling a ch-1 sp.
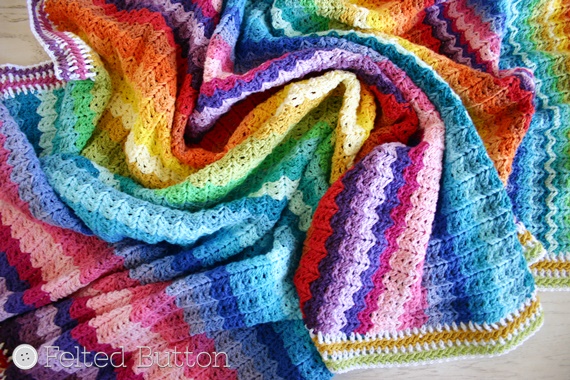

Illuminations Blanket
I designed it using a stitch that might be familiar to you because I used it in my Herringbone Pillow here. I call it a herringbone because it has nifty little overlapping "V"s, but is made by a simple US dc with just a change of stitch placement across the row.
I made it with the fabulous Scheepjes *Cotton 8. You can read my review of the yarn here. I went a bit "crazy" over the colors of Cotton 8 because they are so brilliant and fun. Soooo, I ended up choosing 32. Fortunately the soft 100% cotton yarn is very affordable. You can get it from Wool Warehouse *here. And they ship internationally.

So let's get to the pattern.
Skill Level: Intermediate
Materials:
Yarn: *Scheepjes Cotton 8 in the following color sequence: (Note: If you want fewer colors or to make your blanket slightly larger, there was about 65m/71yds of each color, except for a bit less of those used in the border, left over. The sample blanket's total yarn requirement was about 3400yds/3108m.)
- 510
- 671
- 716
- 639
- 714
- 551
- 508
- 722
- 669
- 642
- 517
- 665
- 723
- 663
- 724
- 725
- 622
- 712
- 563
- 519
- 506
- 651
- 653
- 719
- 718
- 654
- 720
- 661
- 529
- 726
- 721
- 502 (white in border)
Hook: 3.5mm (F) hook
Dimensions with border: 44in x 59in (112cm x 150cm)
(Note: If you want to change up your dimensions, you can use the multiple number of 4 + 3. Just chain to your desired width in multiples of 4 and then add 3 more. Work the repeat rows to your desired height.)
Stitch Abbreviations (in US terms):
dc = double crochet
st = stitch
sk = skip
ch = chain
sp(s) = space(s)
sl st = slip stitch
rep = repeat
Rnd(s) = Round(s)
Cl = 2-dc Cluster (see Special Stitches)
Special Stitches:
• shell--(2 dc, ch 2, 2 dc) in indicated st or sp
• Cl (2-dc Cluster)—(yo, insert hook in designated st or sp, yo and draw through, yo, draw through two loops) twice, yo, draw through all 3 loops on hook
• half-closed dc—bold portion of Cl (above) worked only once
• join with sc--with slip knot on hook, insert hook in designated st, yarn over and draw through st, yarn over and draw through both loops on hook
Blanket Pattern:
With the first color in sequence, ch 183 (4 X 45 repeats + 3)
Row 1 (RS): shell (see Special Stitches) in 5th ch from hook, (sk next 3 chs, shell in next ch) across to last 2 chs, sk next ch, dc in last ch, turn --45 shells and 2x1 dc

This shows the first shell in the 5th ch from the hook. Remember, the shell is made with (2 dc, ch 2, 2 dc).
Skip 3 chs before working the next shell in your foundation.

Don't be worried about the "bend" you get in Row 1. There are a lot of stitches there but things pull together after the next row and straighten out.
Row 2: ch 3 (counts as dc), *[working over ch-2 loop of last row, dc in same foundation ch as next shell drawing up long loop to height of working row, (dc, ch 2, dc) in ch-2 sp of same shell, working over ch-2 loop of last row, dc in base of same shell drawing up long loop to height of working row] across, ending with dc in top of turning ch, turn

The trickiest part about this whole stitch pattern is the stitch placement. For Row 2 you will be putting your hook first where the red X is shown. This is the same place where your shell from Row 1 was worked. Then work (dc, ch 2, dc) in the ch-2 sp marked by the black X. Finally, working over the previous row again, place another dc in the same place as your first dc of this "shell"--the red X again.
Let me show you. This is the start of a dc (remember loooong loop) in the red X space of the foundation ch.

First dc done. Now work (dc, ch 2, dc) under the loop (ch-2 sp) marked by the black X.
Now you'll work another dc in the space marked by the red X again.

And do this to the end of the row. When you have completed working over your last shell, complete a dc in the turning ch.
And turn your work. On to Row 3...
Row 3: ch 3 (counts as dc), [dc in ch-sp of next ch-2 sp on row before last, drawing up long loop to height of working row, (dc, ch 2, dc) in next ch-2 sp on last row, dc in same ch-sp on row before last, drawing up long loop to height of working row] across, ending with dc in top of turning ch, turn

Ch 3 (which counts as a dc). Now you will be working over the last row and into Row 1. The loop marked by the red X with the needle inserted is where you will put your hook for the next dc.
Then work (dc, ch 2, dc) under the ch-2 sp marked by the black X.
Now placing another dc where that first dc of the shell went completes the first herringbone "shell".
So deconstructing the first "shell", notice the placement of each of the stitches. This is essentially what you'll be doing for each row from here on.
Repeat Row 3 through the color sequence (1-31). You can decide when to do your color changes. I started by going through each color in the sequence for a single row. Then I repeated the color sequence using each color for two rows, then worked each color in sequence for three rows. I like the "randomness" and scrappy feel this gives, but lots of color changes makes for more ends to weave. Basically each color was worked for a total of six rows if you prefer to try that. And honestly, if I had to do it again, I might remove one of the lighter pinks--or at least separate them in sequence--because in certain lights they just don't provide enough contrast to each other. (Those are colors 25 and 26 above.)
By the way, when I changed colors, I brought the new color through on the final yarn-over of the last stitch of the row and fastened off the old before turning and working with the new color.
Final Blanket Row: ch 3 (counts as dc), [dc in ch-sp of next ch-2 sp on row before last, drawing up long loop to height of working row, 2 dc in next ch-2 sp on last row, dc in same ch-sp on row before last, drawing up long loop to height of working row] across, ending with dc in top of turning ch, turn
Let's move on to the border--but weave those ends first! (Just breathe and have your favorite treat to celebrate the near completion of your superb creation! It will totally be worth it when you have this super soft, happy blanket!)
Border: (Worked in the round with the same side facing throughout. The side facing you will become the right side--it doesn't really matter which you pick.)
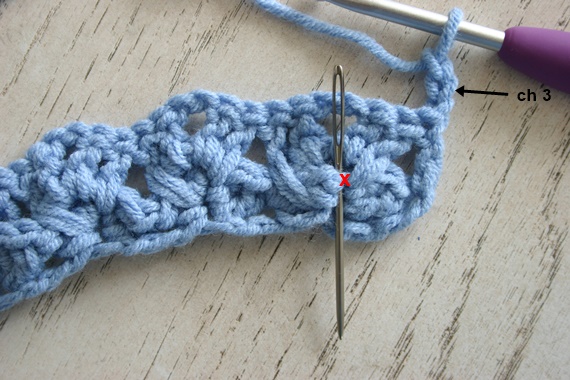
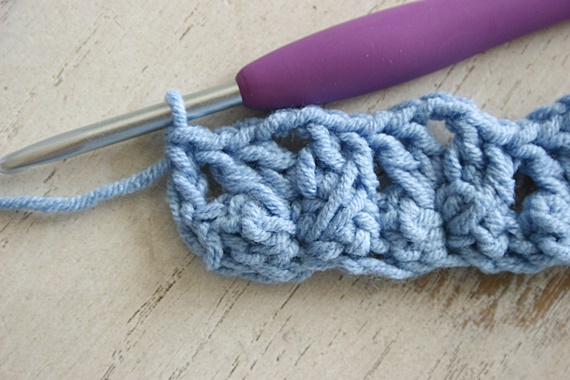
Rnd 1: with white (32), join with a sl st in the top right blanket corner, ch 6 (counts as dc, ch 3), dc in same st as joining, ch 1, sk 1 dc, (dc in next dc, ch 1, sk 1 dc) rep across to corner, (dc, ch 3, dc, ch 1) in corner, (dc in side of next row, ch 1) rep to corner, (dc, ch 3, dc, ch 1) in corner, (dc in ch-sp, ch 1, dc in base of herringbone--see Picture below, ch 1) across to corner, (dc, ch 3, dc, ch 1) in corner, (dc in side of next row, ch 1) rep to first corner, join with sl st to 3rd ch of ch 6, fasten off
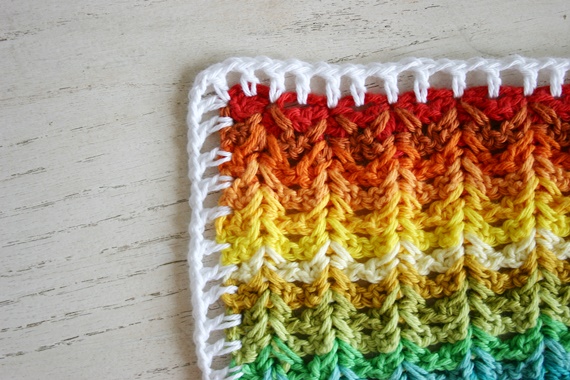
This shows stitch placement of Rnd 1 of the border along the bottom edge (shown worked into the red which was really Row 1) and the blanket edge working into each row along the side.
Because I couldn't decide which of the beautiful colors to use, I decided to use more by changing colors along each side of the blanket at the beginning of each corner for Rnds 2 and 4. It's up to you.
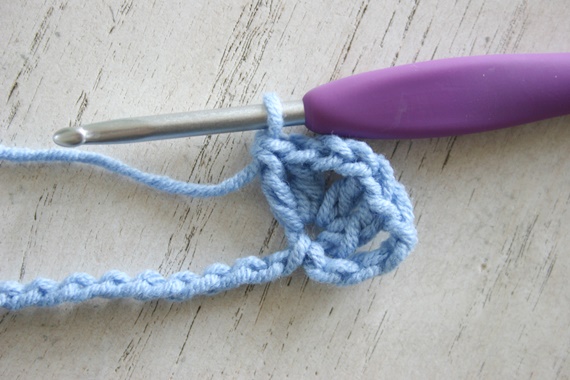
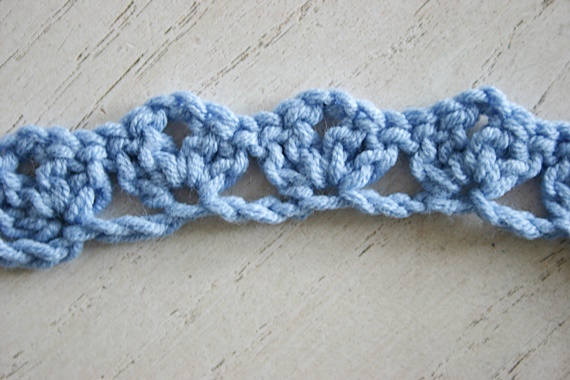
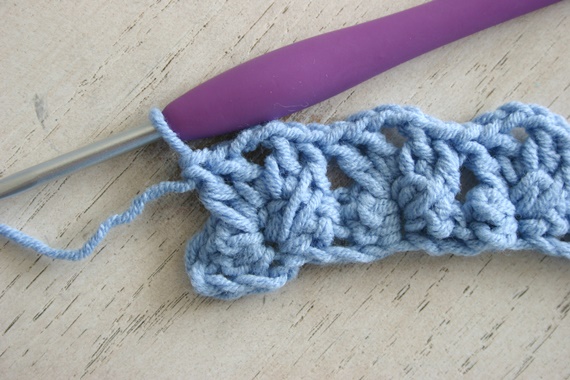
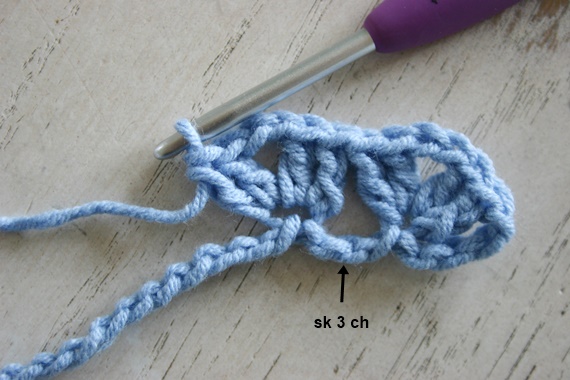
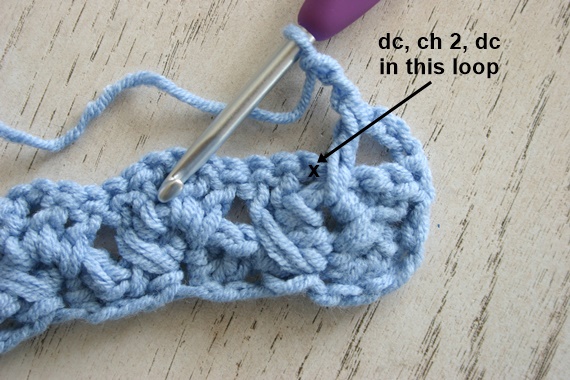
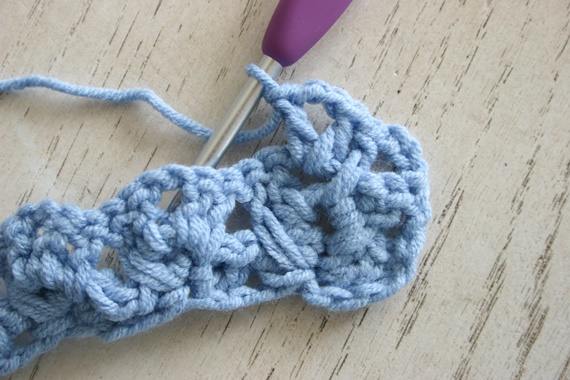
Rnd 2: with color(s) of choice and working in ch-sps around, join with sl st in any ch- 3 corner sp, ch 3 (counts as dc), 4 dc in same sp as joining, ch 1, [work first half-closed dc in same ch-3 corner sp, sk next ch-1 sp, work second half-closed dc in next ch-1 sp, complete Cl, ch 1, *working behind last dc made, work first half-closed dc in skipped--or previous--ch-1 sp, work second half-closed dc in next ch-1 sp, complete Cl, ch 1; rep from * across to corner working last "leg" of final Cl in corner ch-sp, ch 1, 5 dc in corner ch-3 sp] rep along other 3 sides omitting final corner, join to top of starting ch-3, fasten off
Let's look at this round more closely because it's a bit tricky until you get the hang of it.

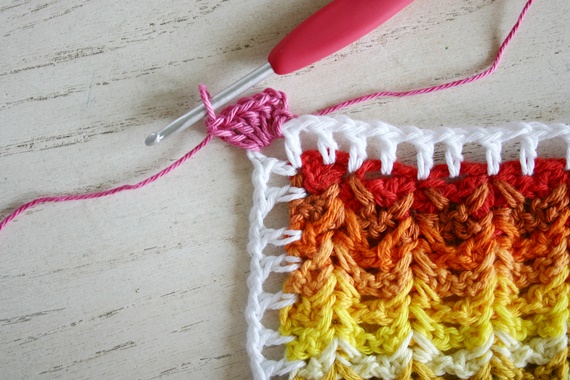
Join with a sl st. Then ch 3, which counts as your first dc.

Complete 4 more dc in the same corner ch-sp. Then ch 1.
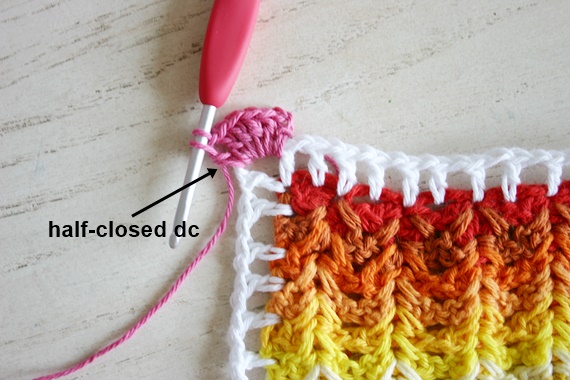
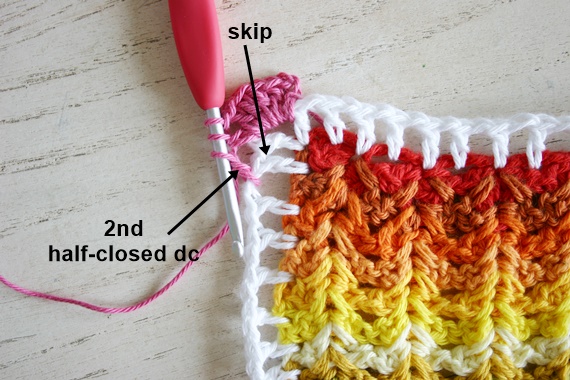
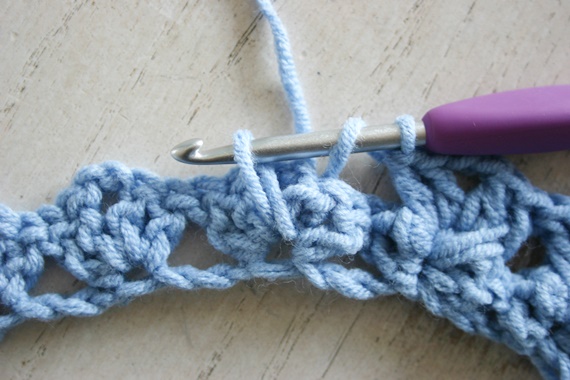
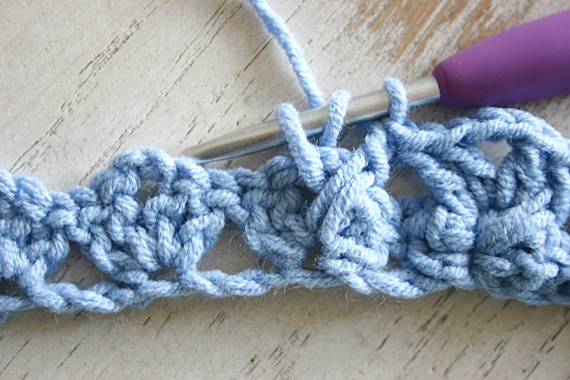
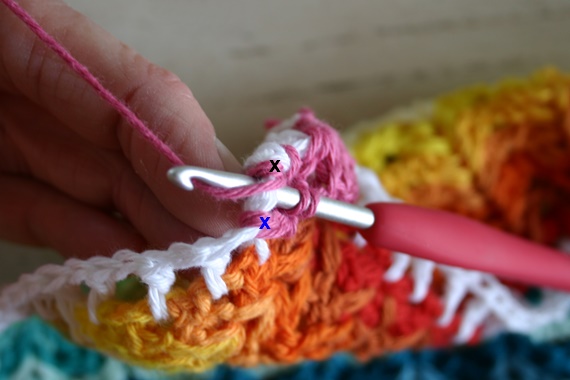
Now work a half-closed dc in the same sp by yarning over, inserting your hook in the ch-3 corner sp, yarning over and drawing through a loop. Then yarn over again and draw through 2 loops on your hook. This leaves just 2 loops as shown above--a half-closed dc.

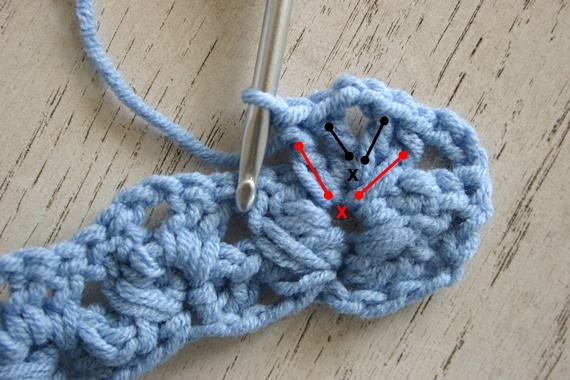
Now skip a ch-1 sp and work your second half-closed dc in the next ch-1 sp. Yarn over and draw through all three loops on your hook...
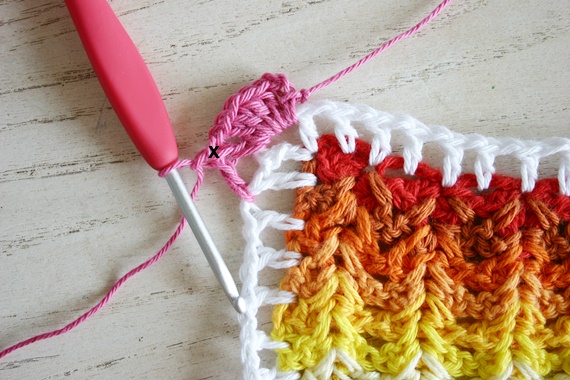
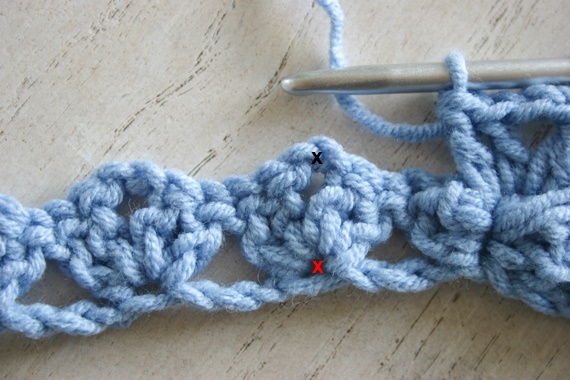
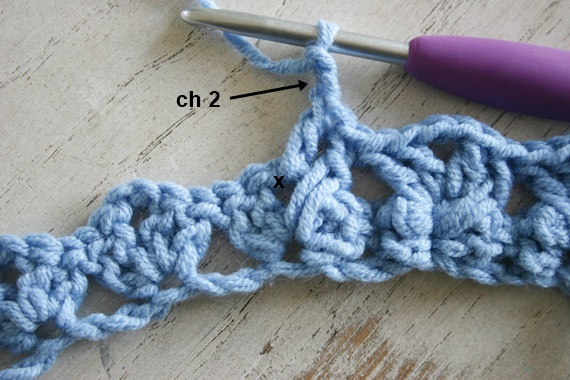
...to close the Cl (marked by the x). Ch 1.
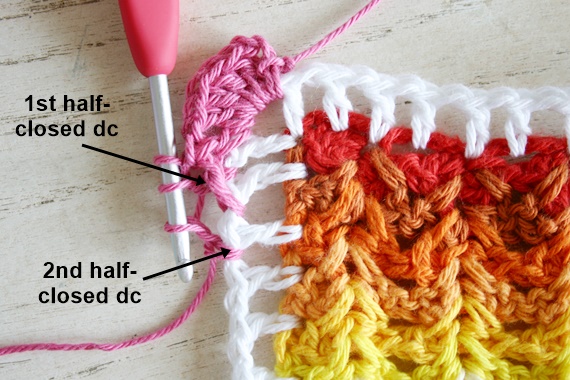
Working behind the Cl just worked, work the first half-closed dc (marked by the x above) in the skipped--or previous--ch-1 sp.

Then work the second half-closed dc in the next ch-1 sp. Yarn over and draw through 3 loops to complete that Cl.
Ch 1. (These ch-1 sps are where your stitches for the next round will go.)
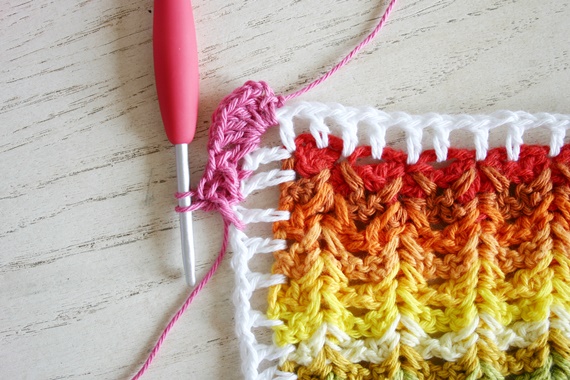
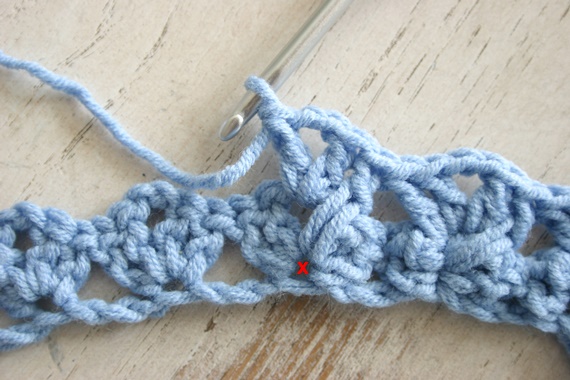
To give you a little better look at where your stitch goes when you work behind the previous "leg" of the Cl, The black X is the second "leg" of the Cl two stitches before. The blue X is the second "leg" of the previous Cl. Your stitch goes in the same ch-1 sp just before the black X. In essence, your clusters are straddling a ch-1 sp.

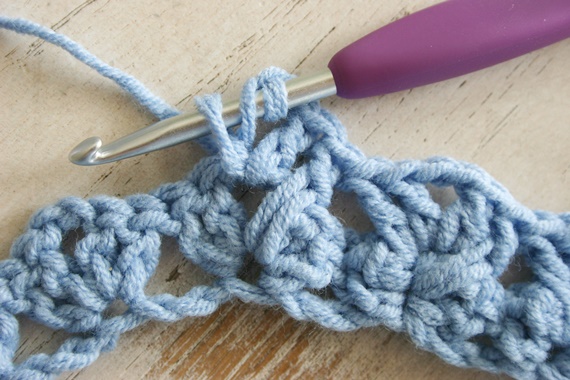
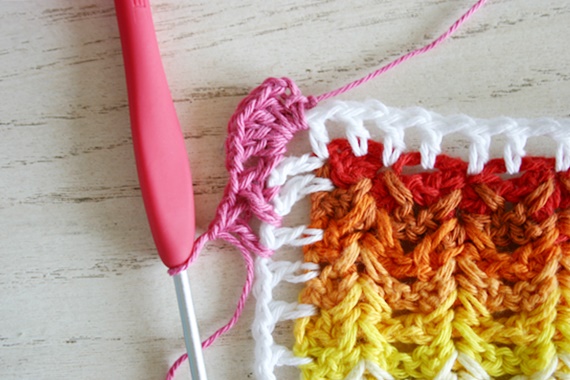
Continue this way to the corner. You finish the corner by working the last leg of the last Cl in the corner ch-sp. (This is where you can change colors, if you want. I just pulled through a new color on the final yarn over of the Cl. Then ch 1 and work 5 dc in the ch-3 corner space with the new color.) Repeat this for the remaining 3 sides, join with a sl st to the top of the beginning ch-3 and fasten off.
Rnd 3: with white (32), join with sl st in center st of any 5-dc group, ch 6 (counts as dc, ch 3), dc in same st as joining, ch 1, *(dc in ch-1 sp, ch 1) rep across to corner, (dc, ch 3, dc, ch 1) in center st of 5-dc group; rep from * around omitting final corner, join to 3rd ch of beginning ch-6, fasten off
Rnd 4: rep Rnd 2
Rnd 5: with white (32), join with sc (see Special Stitches) in first ch-1 sp to left of any corner, ch 1, *(sc in next ch-1 sp, ch 1) rep to 5-dc corner group, sk first dc of group, sc in next, ch 1, (sc, ch 1, sc, ch 1) in center dc of group, sc in next dc, ch 1, sk last dc of group; rep from * on each side of blanket, join with sl st to first sc, fasten off
Weave in ends and ENJOY!!
If you find any errors or have any questions, feel free to message me on Facebook via PM or through Etsy convo. I'm Felted Button everywhere! And feel free to share your projects in my Facebook group here or anywhere using #FeltedButton or #IlluminationsBlanket.
I hope you love making this blanket as much as I have and that it "Illuminates" your world. It's the perfect size for me and the perfect weight of blanket for all year-round. Plus, color makes me happy!

Come see what colorful projects, inspiration, design planning, WIPs, yarn and crochet-related things are happening with Felted Button by following on Pinterest here, Instagram here and Facebook here.
| On the Board | -- I'm going to stand outside. If anyone asks, tell them I'm OUTSTANDING!
* This post contains affiliate links marked by an asterisk. Thanks for your support.

Related Posts
Free Crochet Pattern | Rinske Square
Let me introduce you to my latest free crochet granny square I've named Rinske. I've partnered with the talented Juli...
Read More
Book Review, Crochet Cute Critters
When I first picked up my hook as an adult to begin crocheting, I did as I typically do when learning new things...I ...
Read More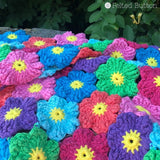
Waikiki Wildflower Blanket Pattern Anew
When I contemplate the beginnings of Felted Button, one of my fondest memories is the creation of my Waikiki Wildflow...
Read More