
Trio Blanket Free Crochet Pattern
Have you got your three Scheepjes Whirls ready and waiting? If so, I've designed a fabulously simple free crochet pattern for you with a mesmerizing result.
Meet the Trio Blanket...
NL Beneden
If you haven't got your hook into any Whirls yet, I suggest you give this magical yarn a try. You can read my thoughts about it here, here and here. This is my third blanket designed with it and two more coming this year! It's simply, well, magical, like I said. Such varied effects can be achieved depending on your color choices and the order you use the three cakes.
I also give a few suggestions for cake color combinations in a post here, but don't limit yourself to my ideas--there are more combinations possible than any two hands can make in a lifetime! Go with what feels good to you! The only thing to consider is if two identical colors will meet and you lose a little contrast. (But maybe that is what you are going for--like in my blanket.)
The sample above was made by my amazing tester and friend, Sandra. As you can see with her cakes, she decided to pull the top two (Brambleberry and Blackberry Mint Chip) from the center and the Sherbet Rainbow from the outside. It's those little changes which can really change the effect of your blanket.

With my sample above, made with Minty Black Velvet, Sea Breeze Tease and Green Tea Tipple, I got this "washed" section in the middle that I think is really neat. It also doesn't have much contrast, but that was intentional, so have fun with your color choices!
Now that you've hopefully been inspired to make your own, let's get to the pattern for the TRIO BLANKET! (Written in US crochet terms.)
I used a 3.5mm (E) hook--which I think was perfect for lovely drape. and one cake of each of the 3 colors. The gauge is not super critical here, but mine was 17.5 rows x 22 dc = 4in (10cm) in this stitch pattern.
Let's define which blanket is which:
Sample A: made with Minty Black Velvet (A), Sea Breeze Tease (B), and Green Tea Tipple (C)

Dimensions:
• Sample A Blanket: 33” X 64” (84cm X 162cm)
If you want to change up your blanket dimensions, the multiple is 6 + 4. That means you will chain any multiple of 6 and then ch 4 more to the width you want. Since you just crochet until the yarn runs out, remember, the wider you make it, the shorter in height it will be.
A couple of notes:
• When changing colors draw the new color through on the final yarn over of the last stitch of the row carrying the yarn loosely up the sides and dropping the old color without cutting the yarn. This is awesome because then you only have 6 ends to weave! Can you see the yarn that has been carried loosely up the side? As long as you don't pull it too tightly, it keeps the edges tidy and is hardly noticeable. Notice the black yarn was "dropped" and the next color in sequence (white) is loosely pulled up on the final draw through of the last stitch of the row.

• All yarn cakes for Sample A were pulled from the center of each cake. The yarn cakes for Sample B were pulled from the center of A and the outside of B and C. Remember, you can decide where to pull from and let your creativity run!
Stitch abbreviations:
ch = chain
hdc = half double crochet
dc = double crochet
rep = repeat
sk = skip
sl st = slip stitch
sp = space
st(s) = stitch(es)

Basically what you have done here is put one sc on top of another sc.

If you want to see the stitch in more detail, I've created a blog post about it and other tidy edge techniques here.The stacked sc is Option #3.
Blanket Pattern:
Final Row:working over ch-3 sp, stacked sc in first st two rows below, dc in next 2 sts two rows below, *hdc in next 3, working over ch-3 sp, dc in next 3 sts two rows below; rep from * across.

Meet the Trio Blanket...
NL Beneden
") |
| Photo used courtesy of Sandra Veneman |
") |
| Photo used courtesy of Sandra Veneman. |
I also give a few suggestions for cake color combinations in a post here, but don't limit yourself to my ideas--there are more combinations possible than any two hands can make in a lifetime! Go with what feels good to you! The only thing to consider is if two identical colors will meet and you lose a little contrast. (But maybe that is what you are going for--like in my blanket.)
The sample above was made by my amazing tester and friend, Sandra. As you can see with her cakes, she decided to pull the top two (Brambleberry and Blackberry Mint Chip) from the center and the Sherbet Rainbow from the outside. It's those little changes which can really change the effect of your blanket.
With my sample above, made with Minty Black Velvet, Sea Breeze Tease and Green Tea Tipple, I got this "washed" section in the middle that I think is really neat. It also doesn't have much contrast, but that was intentional, so have fun with your color choices!
Now that you've hopefully been inspired to make your own, let's get to the pattern for the TRIO BLANKET! (Written in US crochet terms.)
I used a 3.5mm (E) hook--which I think was perfect for lovely drape. and one cake of each of the 3 colors. The gauge is not super critical here, but mine was 17.5 rows x 22 dc = 4in (10cm) in this stitch pattern.
Let's define which blanket is which:
Sample A: made with Minty Black Velvet (A), Sea Breeze Tease (B), and Green Tea Tipple (C)
Sample B: made with Brambleberry (A), Sherbet Rainbow (B), and Blackberry Mint Chip (C)
 |
| Photo used courtesy of Sandra Veneman. |
Dimensions:
• Sample A Blanket: 33” X 64” (84cm X 162cm)
• Sample B Blanket: 38” X 50” (97cm X 128cm)
If you want to change up your blanket dimensions, the multiple is 6 + 4. That means you will chain any multiple of 6 and then ch 4 more to the width you want. Since you just crochet until the yarn runs out, remember, the wider you make it, the shorter in height it will be.
A couple of notes:
• When changing colors draw the new color through on the final yarn over of the last stitch of the row carrying the yarn loosely up the sides and dropping the old color without cutting the yarn. This is awesome because then you only have 6 ends to weave! Can you see the yarn that has been carried loosely up the side? As long as you don't pull it too tightly, it keeps the edges tidy and is hardly noticeable. Notice the black yarn was "dropped" and the next color in sequence (white) is loosely pulled up on the final draw through of the last stitch of the row.
• All yarn cakes for Sample A were pulled from the center of each cake. The yarn cakes for Sample B were pulled from the center of A and the outside of B and C. Remember, you can decide where to pull from and let your creativity run!
Stitch abbreviations:
ch = chain
hdc = half double crochet
dc = double crochet
rep = repeat
sk = skip
sl st = slip stitch
sp = space
st(s) = stitch(es)
 |
| Photo used courtesy of Sandra Veneman. |
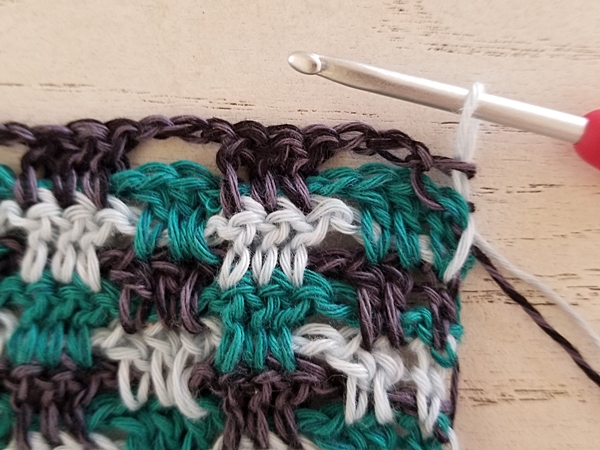
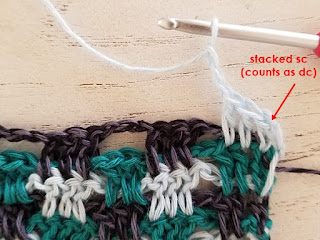
There is only one special stitch. I call it a stacked sc and use it to replace a beginning ch-3 at the start of a row to make a tidier edge. It acts as a dc--just like a ch-3 typically does. Here's how I explain it:
Stacked sc (counts as dc): insert hook in designated st, yarn over and draw through st, yarn over, draw through both loops on hook (sc made), insert hook through left leg of sc just made, yarn over and draw through left leg, yarn over, draw through both loops on hook.

Basically what you have done here is put one sc on top of another sc.

If you want to see the stitch in more detail, I've created a blog post about it and other tidy edge techniques here.The stacked sc is Option #3.
Blanket Pattern:
Sample A was made with a starting ch of 208 (6 X 34 reps + 4); Sample B was made with a starting ch of 244 (6 x 40 + 4)
With A ch a multiple of 6 +4
Foundation Row: hdc in third ch from hook, hdc in next ch, *ch 3, sk next 3, hdc in each of next 3 ch; rep from * across, turn. Drop A, draw B through last loops. (206 sts for Sample A; 242 sts for Sample B)
Row 1: with B, ch 3, sk next 3 hdc, *working over next ch-3 sp, dc in each of next 3 skipped ch in foundation ch, ch 3, sk next 3 hdc, rep from * across, sc in top of turning ch, turn. Drop B, draw C through last loops.
Row 2: with C, working over ch-3 sp, stacked sc in first st two rows below, dc in next 2 sts two rows below, *ch 3, sk 3 sts, working over next ch-3 sp, dc in each of next 3 skipped sts two rows below; rep from * across, turn. Drop C, draw A through last loops.
Row 3: with A, ch 3, sk next 3 dc, *working over next ch-3 sp, dc in each of next 3 skipped dc two rows below, ch 3; rep from * across, sc in top of stacked sc, turn. Drop A, draw B through last loops.
Repeat Rows 2 and 3alternating colors A, B, and C until there is insufficient yarn to complete more than the final row.
Your final row is a repeat of row 2 replacing the dc that work over the ch-3 with a hdc because this gives it a bit straighter edge. If you have enough yarn and want to end your final row as a Row 3 repeat you can most certainly do that in the same way!

***Edit: Since I've had quite a few requests for a Dutch translation of this pattern, you can find it here: (Thanks, Scheepjes and Carmen!)

***Edit: Since I've had quite a few requests for a Dutch translation of this pattern, you can find it here: (Thanks, Scheepjes and Carmen!)
Materialen
Scheepjes Whirl (60% katoen, 40% acryl; 1000m/215g)
Kleuren Sample A: 1 bol elk van de kleuren Minty Green Velvet (A), Sea Breeze Tease (B), en Green Tea Tipple (C)
Kleuren Sample B: 1 bol elk van de kleuren Brambleberry (A), Sherbet Rainbow (B), Blackberry Mint Chip (C)
3,5mm haaknaald
Draadspanning
17,5 rijen x 22 steken in genoemd stekenpatroon = 10x10cm
Gebruikte afkortingen
L = losse
HST = half stokje
ST = stokje
HST = half stokje
ST = stokje
HERH = herhaal
HV = halve vaste
STK(N) = steek/steken
Speciale steken
In dit patroon wordt slechts één speciale steek gebruikt, namelijk de gestapelde vaste. Deze wordt gebruikt in de plaats van een ‘3l’ op het begin van de rij, en het zorgt voor een nettere zijkant van je werk. Een gestapelde vaste telt als een stokje, net als normaal gesproken een ‘3l’ doet.
Gestapelde vaste (telt als st): Steek haaknaald in de desbetreffende steek, omslag en haal een lus op, omslag en haal door beide lussen op de naald (1 vaste is gemaakt), steek naald door de linkerlus van de vaste die je net hebt gemaakt, omslag en haal een lus op, omslag en haal door beide lussen op de naald.

Hier wordt met rood de linkerlus aangeduid.

Je hebt in principe een
vaste bovenop een vaste gehaakt.
Tips
Het stekenpatroon is een veelvoud van 6+4. Als je de breedte van de deken wilt veranderen, neem je dus een veelvoud van 6 steken voor de lossenketting, en tel daar nog 4 steken bij op. Dit patroon is bedoeld om door te haken totdat je garen op is, dus een bredere deken zal wel korter zijn in de lengte als je dezelfde hoeveelheid garen gebruikt.
In dit patroon gebruik je de drie bollen Whirl wisselend gedurende het hele patroon. Knip het garen niet af bij een kleurwissel! In plaats daarvan voltooi je de laatste doorhaal van een steek vóór de kleurwissel met de ‘nieuwe’ kleur. De niet gebruikte garens worden losjes aan de zijkanten meegenomen. Zolang je deze niet te strak trekt blijven de zijkanten van je werk netjes en valt het nauwelijks op dat je daar een extra draadje garen hebt lopen.
Alle Whirls voor Sample A zijn van binnenuit begonnen. Voor Sample B is begonnen van binnenuit voor kleur A, en van buitenaf voor kleur B en C. Je kunt zelf natuurlijk bepalen van welke kant van de Whirls je begint, laat je creativiteit in de vrije loop!
Patroon
Begin een lossenketting met kleur A. Haak een veelvoud van 6 stkn en tel daar nog 4 stkn bij op. Voor Sample A (84x162cm) is een lossenketting van 208 lossen opgezet (6x34 +4). Voor Sample B (97x128cm) is een lossenketting van 244 lossen opgezet (6x40 +4).
Opzetrij:
1hst in de 3e l vanaf de naald, 1hst in de volgende l, *3l, sla 3 stkn over, 3hst, herh vanaf * tot het eind van de rij. Gebruik kleur B om de laatste steek van de rij te voltooien, laat kleur A hangen. Keer je werk.
Rij 1. Met kleur B: 3l, sla 3 stkn over, *3hst in de volgende 3 overgebleven lossen van de lossenketting, je haakt nu over de 3l gehaakt tijdens de vorige rij, 3l, sla 3 stkn over, herh vanaf * tot het eind van de rij, 1v in de bovenste l van het begin van de vorige rij, gebruik kleur C voor het voltooien van deze steek. Laat kleur B hangen, keer je werk.
Rij 2. Met kleur C: gestapelde vaste in de eerste stk van 2 rijen terug, je haakt nu over een lossenketting, 2st, *3l, sla 3 stkn over, 3st in de 3 overgeslagen stkn van 2 rijen terug, je werkt nu over een lossenketting, herh vanaf * tot het eind van de rij. Voltooi de laatste stk met kleur A. Laat kleur C hangen en keer je werk.
Rij 3. Met kleur A: 3l, sla 3 stkn over, *3st in de 3 overgeslagen stkn van 2 rijen terug, je werkt nu over een lossenketting, 3l, sla 3 stkn over, herh vanaf * tot het eind van de rij, 1v in de gestapelde vaste, voltooi deze stk met kleur B. Laat kleur A hangen en keer je werk.
Herhaal Rijen 2 en 3 en blijf kleuren A, B en C wisselen. Eindig na een Rij 3, met nog genoeg garen over voor nog één laatste rij.
Laatste rij, met de volgende kleur: gestapelde vaste in de eerste stk van 2 rijen terug, je haakt nu over een lossenketting, 2st, *3hst, 3st in de 3 overgeslagen stkn van 2 rijen terug, je werkt nu over een lossenketting, herh vanaf * tot het eind van de rij.
Werk de eindjes weg en klaar is je deken!
 |
| Photo used courtesy of Sandra Veneman. |
Easy peasy, huh? This is the kind of blanket you can make while binge watching Netflix or tending to little ones. It's a rhythmic and relaxing pattern, I think, with a result that looks a lot harder than it is. I give credit to the Scheepjes Whirl for that.
I also try to provide nice and tidy, ad-free PDF versions of most of my free patterns for a small fee right here in my Felted Button Shop, or on Etsy here or LoveCrafts here.
If you would like to get some Scheepjes Whirl and you use the *affiliate links below it doesn't cost you any more but provides me a small commission which allows me to continue providing free patterns.
Here's where you can get yours...
All of the above places provide international shipping, too! (Sometimes you can get free shipping with a code or an order over a certain amount.)
You can also find them in many local shops throughout the world. The list is here.
I'm afraid to even mention this, because I might come across as a little obsessed with Whirl, but I've been busy designing a blanket with 4 Whirls. Someone stop me now! Wait. No. Leave me alone with my magical Whirls. ;)
If you want to keep up on my newest pattern releases and colorful hooky happenings, subscribe to my newsletter, or follow on Facebook here or Instagram (@FeltedButton) here. Watch here for a new design reveal tomorrow!
| On the Board | -- Faith it 'til you make it.

Related Posts
Elan Blanket Crochet Pattern
Go ahead. Ask me how many works-in-progress I have right now. Guess what? I'm not going to admit how many there are. ...
Read More
Neighborhood Scarf Free Crochet Pattern
Today is free pattern day! Below is the free crochet tutorial for my Neighborhood Scarf which I introduced and explai...
Read More
Neighborhood Scarf Reveal -- In Honor of Mr. Rogers
Last week I teased you with some unusual photos from my latest creation. And then I began a story that I'm going to f...
Read More