
Window to the Whirl Free Crochet Pattern Part 1
The flowers of spring are now officially proclaiming their presence here in Utah--the pinks and purples of the phlox, the vibrant red tulips, the bright white blooms of candytuft, the pale pink floral popcorn adorning the cherry trees, and brilliant yellow of the creeping buttercups. They all make me happy as they foretell of the warm and colorful days of summer. But no matter the time of year, my hook stays busy trying to keep up with the colorful ideas in my head. Remember my Window to the Whirl Blanket that I shared here?
 made with Scheepjes Whirl and Whirlette")
Today I'm sharing Part 1 of the crochet pattern with you. Why only Part 1? I quickly realized during the pattern writing phase, that this pattern took a little bit of explaining beyond what some other designs might require. And a blog post with the whole pattern might be a bit overwhelming for you and for me. So I'm sharing Part 1 today, and will provide Part 2 next week in a separate post to simplify things a bit. Next week the PDF for the whole pattern will be available for a small fee--ad-free and with all the pictures in a section together so printing is easy peasy.
So let's get on with the pattern for Part 1, which is this panel--Section 1...
 made with Scheepjes Whirl and Whirlette (Part 1 -- Intermeshing Panel)")
This photo is actually of the wrong side of the blanket, but, alas, both sides are nearly identical so this blanket is terrifically reversible! You know that's how I like to roll--both sides of the blanket looking equally good. The pattern is rated as Experienced, only because of the intermeshing technique used for this panel, but it's just a little learning curve at the start and then off to the races. Anyone who is ambitious and knows their way around basic stitches can pull this off. This panel uses one complete Whirl and 2+ balls of Whirlette. You might be convinced by now that I adore this magical yarn. You can read more about it here, here and here. It really does most of the work--and I'm particularly pleased with the way the gradient changes throughout the black window frames.
Quickly, before I begin this panel's pattern, let's talk about materials for the whole blanket.
I used 2 Scheepjes Whirls and 5 Scheepjes Whirlettes. Color A is the Whirlette in Liquorice. Color B is the Key Lime Pi. Color C is the Murderous Mint but we won't need that until Part 2 of the pattern.

Here are the other colorways I put together.


 So, now to the pattern.
Window to the Whirl Blanket Pattern
Other Materials:
Hook: 3.5mm and 4mm hook (optional)
Locking stitch markers (a safety pin works, too, but I actually used a wee alligator hair clip)
General Blanket Notes:
Stitch Abbreviations (US Terms):
Notice the stitches are all pretty typical. Don't worry about the Cl just yet as it's used in the border only so I'll explain that in Part 2 next week. The dcb and dcf are regular dc, but where you work them is the key. Let me explain...
I'll show you more in a minute. But first, let me give you a few notes about the intermeshing technique used in this part of the pattern.


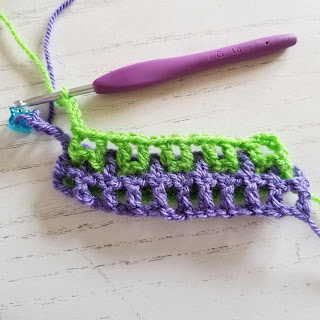
 This shows a dcf, worked in front of the B mesh and into the next dc of the A mesh.


Pick up A. Notice that B is dropped to the front towards you. This will put it in the right place for working its row.

This row begins with a dcf as shown above. Then ch 1.

Work that last dc into the last turning ch of A. Then drop A, ch 4, place your marker and pick up B.
Row 2b (WS): With B, dcf in next dc, *ch 1, dcf in next dc; rep from * across, ch 4, drop B, turn
 Remember, B is always worked as dcf across, as shown above.

 Then ch 4, drop B, place a marker and turn your work.


 made with Scheepjes Whirl and Whirlette")
Deramores* (UK)
Knotty House* (CA)
Black Sheep Wools* (UK)
Stitched Naturally (US)
Local Scheepjes stockists
Instagram and Facebook, as well as in my group, are other great places to follow me around and keep in the "Button" loop. All things crochet, color and happy can be found there!

 made with Scheepjes Whirl and Whirlette")
Today I'm sharing Part 1 of the crochet pattern with you. Why only Part 1? I quickly realized during the pattern writing phase, that this pattern took a little bit of explaining beyond what some other designs might require. And a blog post with the whole pattern might be a bit overwhelming for you and for me. So I'm sharing Part 1 today, and will provide Part 2 next week in a separate post to simplify things a bit. Next week the PDF for the whole pattern will be available for a small fee--ad-free and with all the pictures in a section together so printing is easy peasy.
So let's get on with the pattern for Part 1, which is this panel--Section 1...
 made with Scheepjes Whirl and Whirlette (Part 1 -- Intermeshing Panel)")
This photo is actually of the wrong side of the blanket, but, alas, both sides are nearly identical so this blanket is terrifically reversible! You know that's how I like to roll--both sides of the blanket looking equally good. The pattern is rated as Experienced, only because of the intermeshing technique used for this panel, but it's just a little learning curve at the start and then off to the races. Anyone who is ambitious and knows their way around basic stitches can pull this off. This panel uses one complete Whirl and 2+ balls of Whirlette. You might be convinced by now that I adore this magical yarn. You can read more about it here, here and here. It really does most of the work--and I'm particularly pleased with the way the gradient changes throughout the black window frames.
Quickly, before I begin this panel's pattern, let's talk about materials for the whole blanket.
I used 2 Scheepjes Whirls and 5 Scheepjes Whirlettes. Color A is the Whirlette in Liquorice. Color B is the Key Lime Pi. Color C is the Murderous Mint but we won't need that until Part 2 of the pattern.

Here are the other colorways I put together.


Window to the Whirl Blanket Pattern
Other Materials:
Hook: 3.5mm and 4mm hook (optional)
Locking stitch markers (a safety pin works, too, but I actually used a wee alligator hair clip)
General Blanket Notes:
• The blanket is worked in 2 sections. Section 1 is worked first using the intermeshing technique. Section 2 is worked in rows along the long side of Section 1. Both sections are worked in rows of alternating colors that are not turned each time. One color is worked across and dropped, then the second color is worked in the same direction across before dropping it, picking up the first color and turning the piece. Today we are only focusing on the intermeshing panel--Section 1.
• Hint: When instructed to drop the yarn, place a locking stitch marker in the working loop.
• Ch 4 counts as (dc, ch 1) throughout.
• The sample blanket is worked until instructed or until you run out of yarn.
• Gauge is not super critical, but here it is in the intermesh panel pattern:
5.5 “windows” wide x 5 “windows” high = 4”/10cm
• Sample blanket with border: 52” X 65” (133cm x 165cm)
Stitch Abbreviations (US Terms):
|
ch
|
chain
|
sc
|
single crochet
|
|
Cl
|
2-double crochet Cluster
|
sk
|
skip
|
|
dc
|
double crochet
|
sl st
|
slip stitch
|
|
dcb
|
double crochet in back
|
sp(s)
|
space(s)
|
|
dcf
|
double crochet in front
|
st(s)
|
stitch(es)
|
|
rep(s)
|
repeat(s)
|
WS
|
Wrong Side
|
|
Rnd(s)
|
Round(s)
|
yo
|
yarn over
|
|
RS
|
Right Side
|
Notice the stitches are all pretty typical. Don't worry about the Cl just yet as it's used in the border only so I'll explain that in Part 2 next week. The dcb and dcf are regular dc, but where you work them is the key. Let me explain...
• double crochet in back (dcb)—double crochet worked into the designated stitch in the same color as on your hook but completed in back of the contrasting color’s mesh
• double crochet in front (dcf)— double crochet worked into the designated stitch in the same color as on your hook but completed in front of the contrasting color’s mesh
I'll show you more in a minute. But first, let me give you a few notes about the intermeshing technique used in this part of the pattern.
• Intermesh consists of two mesh panels worked simultaneously and interwoven by reaching in front of (dcf), or in back of (dcb), the contrasting color to complete a dc. This pattern results in a double mesh layer with both sides of the reversible blanket being rows of squares--hence reversible!
• Mesh is worked by (dc, ch 1) repeated across. All dc are worked into dc of the same color as on your hook with ch-1 sps between each.
• When working dcf, your hook should always stay on the front of your work. When working dcb, your hook should always stay on the back of your work.
• Always drop your non-working loop to the FRONT before beginning with a new color.
• Always insert your hook through the front of the stitch, even when working dcb.
• The foundation ch of this intermeshing pattern for Color A is a multiple of 4 + 4. The foundation ch for Color B is always 2 less. I say this so you can make a small sample if you want to practice, or to adjust the dimensions of your panel.
Foundation Row:
• With A, ch 144, dc in 6th ch from hook (turning ch-5 = ch 1, dc, ch 1), *ch 1, sk 1 ch, dc in next ch; rep from * across, ch 4, drop loop, set aside. (70 windows)
• With B, ch 142, and rep above (69 windows)

Notice that A shown here in my small sample has one more window than B.
• Place A-colored layer on top of B-colored layer with the working yarn at the same edge (right-handed to the right; left-handed to the left).

Notice that you the posts of B are peeking through the "windows" of A.

Row 1a (RS): With A, dcb in next dc, *ch 1, dcf in next dc, ch 1, dcb in next dc; rep from * across to last dc, ch 1, dcf in last dc, ch 4, drop A, do NOT turn

That's a dcb. Remember, work only into the same color as on your hook, so A is worked into A, reaching through the window of B, to complete a dc.

This gives you another view of A that is worked behind, not over B. They are interwoven but never actually crocheted into one another. Also remember to always ch 1 between each dc. This is mesh, right?


Continue this across alternating between (dcb, ch 1) and (dcf, ch 1). When you get to the end, dc in the ch-4 sp (or the 4th ch of the ch-5 turning ch if you wish). Don't turn your work, but ch 4, drop A, place a marker to hold your loop, and pick up B.

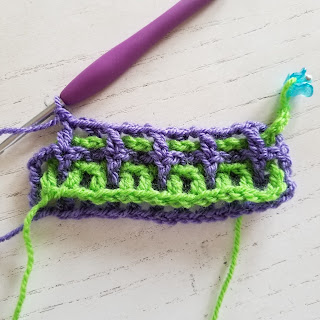
Row 1b (RS): With B, dcf in next dc, *ch 1, dcf in next dc; rep from * across, ch 4, drop B, turn

Let me show you. B is always worked (dcf, ch 1) across. Just make certain to work into B between the "windows" created by the last row of A.

Also, don't forget that your hook needs to always stay in front of the A mesh. I find that pushing the top of the B dc through the window to the front with my finger helps me get my hook into it more easily. Don't worry, you'll find your rhythm here.

Work your first (dcf, ch 1) then continue across.

When you get to the end, pick up that turning loop on B and work a dcf into it.

Then ch 4, drop B, place a marker, and turn your work.
Row 2a (WS): With A, dcf in next dc, *ch 1, dcb in next dc, ch 1, dcf in next dc; rep from * across to last dc, ch 1, dcb in last dc, ch 4, drop A, do NOT turn

Pick up A. Notice that B is dropped to the front towards you. This will put it in the right place for working its row.

This row begins with a dcf as shown above. Then ch 1.

Dcb is worked next. Ch 1. Continue alternating these to the end.

Work that last dc into the last turning ch of A. Then drop A, ch 4, place your marker and pick up B.
Row 2b (WS): With B, dcf in next dc, *ch 1, dcf in next dc; rep from * across, ch 4, drop B, turn


When you get to the end, grab that turning ch of B through the window and complete a dcf...(or work into the 3rd ch, if you prefer).

Repeat Rows 1-2 for pattern until piece measures 60”/155cm or until you run out of yarn, ending on a Row 2a rep but omitting final ch 4 for both colors, fasten off both

With B dropped to the front towards you, pick up A and complete (dcb, ch 1) in the first dc, then work (dcf, ch 1)--alternating across with your last dcf in the turning ch of A. Note that this is the Right Side of your piece. You can always recognize it because of the "blank windows" on that foundation row.

Also, note that the two layers of mesh on that foundation row aren't connected together, as shown above. But don't worry about this as they will be fastened together when the border is worked in Part 2. (There are a couple other ways to start intermeshing crochet to avoid this, but with a project this big they seemed ultra-fiddly and unmanageable, and since I knew there was going to be a border, I knew it would be fixed with a lot less trouble. So there you go.)
Continuing on...


And keep repeating until you run out of yarn, ending on a Row 2a rep. My sample panel was 75 "windows" high, but if yours has more or fewer windows, don't worry as the rest of the pattern will still work with differing numbers.
Once you've got this intermeshing gig down, I think you'll find that it's relaxing and fun to work, the fabric is a fabulous weight in the Whirl, and it won't require even checking the pattern.
You've got this. And maybe you've learned a new crochet skill in the process. I hope you enjoy it. You can find Section 2 (that other side panel) and the border in a post here. If you're wanting to have this pattern in a tidy PDF, it is available here on Felted Button, and on Etsy, too. All the pictures and explanations are included there for reference in one place, but they are all at the end of the pattern so you don't need to print them, if you want to save ink.
 made with Scheepjes Whirl and Whirlette")
Here are some other places you can get your Scheepjes yarn around the world:
Wool Warehouse* (UK)Deramores* (UK)
Knotty House* (CA)
Black Sheep Wools* (UK)
Stitched Naturally (US)
Local Scheepjes stockists
If you are new to this technique and lacking confidence or having trouble, I strongly suggest joining my Felted Button Crochet Community group on Facebook for support and inspiration. Click here to request to join and I'll add you.
Instagram and Facebook, as well as in my group, are other great places to follow me around and keep in the "Button" loop. All things crochet, color and happy can be found there!
I'm off to walk the dog, smell the spring flowers, and hopefully be inspired by nature for some new hooky projects.
Be well. xx
| On the Board | -- It is extremely important for you to believe in yourselves, not only for what you are now, but for what you have the power to become.
~~Neal A. Maxwell

*This post contains affiliate links that if used by you cost you no more but provide me a small commission that allows me to continue providing free patterns. Thanks!
Related Posts
YARN 8 Book-a-Zine: How to Make Felted Mitts
Ever since discovering the magic of felting, I'm honestly gleeful when I get to create anything with the technique. R...
Read More
Prism Pillow Crochet Pattern
You know when you are finished with a project and are left with the few bits of leftover yarn--and those leftovers ar...
Read More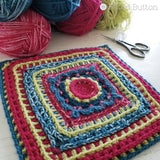
Free Crochet Pattern | Rinske Square
Let me introduce you to my latest free crochet granny square I've named Rinske. I've partnered with the talented Juli...
Read More