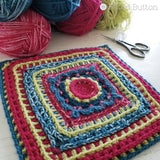
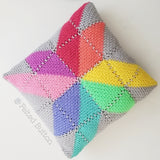
Happiness + Harlequins = Happy Harlequin Blanket--Free Crochet Pattern

It's happy! It's made with diamonds! And it's colorful! I looove this blanket for a myriad of reasons, and these are just a few.


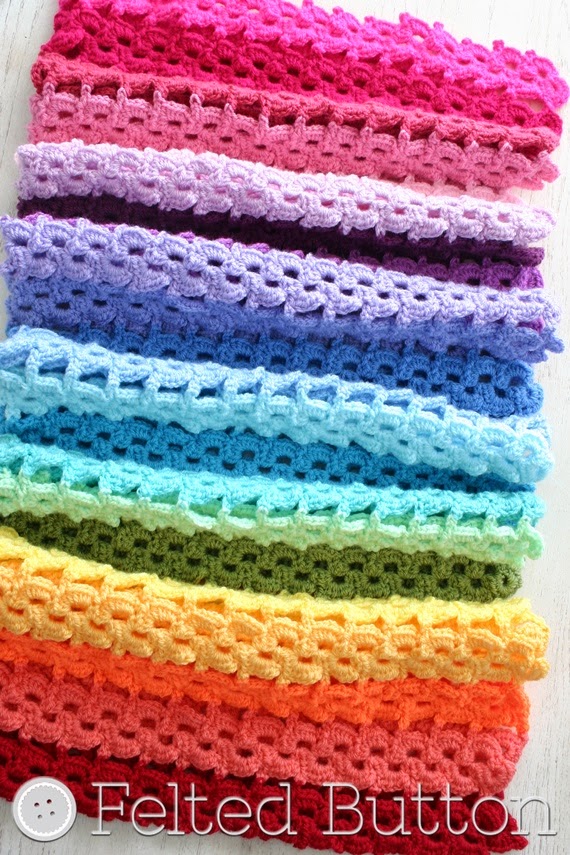
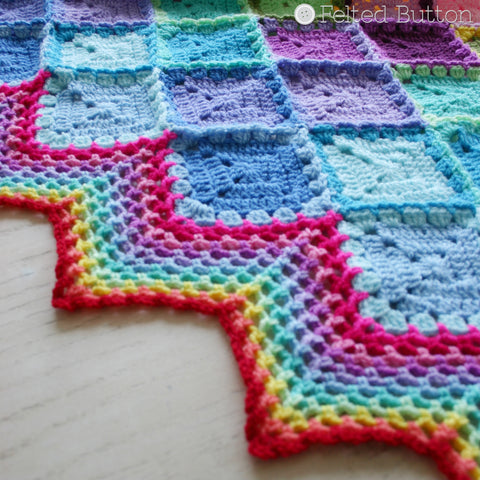
But don't let me forget the totally terrific border. Again, super simple but it lays so nice and flat. I like that--no curly and wonky border.
Did I mention how much I love the colors of this yarn?! It is made from the same yarn as my Pansy Parade Blanket. Remember this one...
Oh, and I almost forgot to mention, the pattern includes a simple way to make it bigger without making and joining more motifs! Now that's nifty!
The pattern is now available--best part...I am sharing it with you for FREE!
Materials:
- Yarn: Scheepjes Colour Crafter* in the following colors (1 ball of each; 328yds/300m; 3.5oz/100g; 100% premium acrylic): Hilversum-A, Appeldorn-B, Tilburg-C, Den Bosch-D, Sittard-E, Amersfoort-F, Meppel-G, Hengelo-H, Heerlen-I, Rhenen-J, Middelburg-K, Texel-L, Urk-M, Den Helder-N, Eelde-O, Almelo-P, Assen-Q, Leerdam-R, Gouda-S, The Hague-T, Leet-U, Maastricht-V
- Hook: 4mm
- Tapestry or yarn needle
Notes:
- Ch 1 at the beginning of a round does NOT count as a stitch but is used to raise your hook in order to complete the next dc. If you find it difficult to complete a dc in the same stitch following a ch-1, you may ch 2, but it still does NOT count as a stitch.
- All joining is completed with a slip stitch unless otherwise noted.
- Motifs are worked in rounds with RS facing throughout. They are also joined to one another and bordered with RS facing.
Although gauge is not critical as there is plenty of yarn, my motif through Rnd 3 = 4in (10cm) wide X 4.5in (11.5cm) high. The final blanket dimensions including the border are 41in (104cm) X 47in (119cm).
Stitch Abbreviations (US Terms):
- bet = between
- RS = right side
- CC = contrasting color
- sc2tog = single crochet two together
- ch = chain
- sc = single crochet
- cl = cluster
- sk = skip
- dc = double crochet
- sl st = slip stitch
- MC = main color
- sp = space
- rep = repeat
- st(s) = stitch(es)
- Rnd = Round
- yo = yarn over
I used a couple of simple special stitches, too. Here they are:
- sc2tog—(insert hook in ch-sp, yo and draw through) twice, yo and draw through all three loops on hook
- cluster (cl)—work 3 dc in same stitch or space
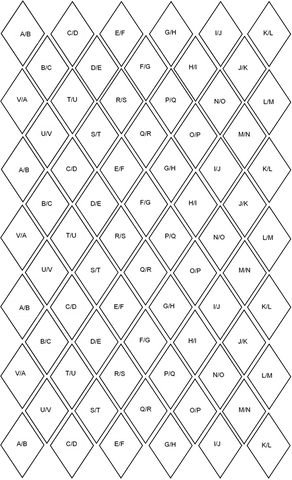
Please refer to this Color Placement Diagram for where to position your squares. (Note: Main Color (MC)/Contrasting Color (CC); Note: When arranging diamond motifs, the ch-3 corners are oriented to the top and bottom of the blanket with the ch-2 corners at the sides.)

Rnd 1 (RS): with MC, magic ring (optional method—ch 3, sl st in first ch to form ring), ch 1, (3dc, ch 3, 3 dc, ch 2) two times in ring, pull tail to close ring, join to first dc –12 dc
Rnd 2: ch 1, dc in each st around completing (2 dc, ch 3, 2 dc) in each ch-3 sp and (2 dc, ch 2, 2 dc) in each ch-2 sp, join to first dc –7 dc each side
Rnd 3: rep Rnd 2, fasten off, weave in ends –11 dc each side
Round 4 is the join-as-you-go round.
- If you do NOT wish to join-as-you-go, complete directions for Rnd 4 as written below for your first and all additional motifs and join using your preferred method.
- If you wish to join-as-you-go, complete Rnd 4 as written below for the first motif. For second and additional motifs, follow the directions under Joining.
Rnd 4: with CC, join in ch-3 corner sp, ch 1, *(cl, ch 3, cl) in ch-3 corner sp—ch-3 corner made, sk 2, (cl in next, sk 2) rep to corner, (cl, ch 2, cl) in ch-2 corner sp—ch-2 corner made, sk 2, (cl in next, sk 2) rep to corner; rep from * one more time, join to first dc, fasten off, weave in ends –five cl each side
Note: If you desire a larger blanket without making more motifs repeat Rnd 2 for a total of 6 rounds, completing Rnd 7 as for Rnd 4 of the smaller motif. Larger motifs = 7.5in (19cm) wide at this gauge.
Joining:
Motifs are joined-as-you-go while working Round 4 by slip stitching to the adjacent neighboring motif. When joining at the corners, the second ch of each ch-3 or ch-2 is replaced with a slip stitch to the neighboring motif’s adjacent corner(s) before continuing the working motif. When joining along the sides, after working each cluster on your working motif, slip stitch between clusters on the adjacent neighboring motif.
Border:
Rnd 1: with A and RS facing, sc bet each cl group with ch-3 before and after each sc working (sc, ch-3, sc) in each external corner and sc2tog at each internal corner across both ch-sp corners of motifs on right and left
Rnds 2-11: with CC (see table below), sc in each ch-3 sp with ch 3 before and after each sc, completing sc2tog at each internal corner across both internal corner ch-3 loops (see Picture Section) and working (sc, ch 3, sc) in each external corner around, join to first sc, fasten off, weave in endsRnd 1: with A and RS facing, sc bet each cl group with ch-3 before and after each sc working (sc, ch-3, sc) in each external corner and sc2tog at each internal corner across both ch-sp corners of motifs on right and left (see Picture Section)
Here's the color sequence for each border round...
Rnd 2 = B
Rnd 3 = D
Rnd 4 = H
Rnd 5 = I
Rnd 6 = L
Rnd 7 = O
Rnd 8 = P
Rnd 9 = R
Rnd 10 = U
Rnd 11 = V
For a small fee, if you would like to support me, you can find the tidy, ad-free PDF with over 20 additional images with explanations to help you through. You can find it on Felted Button or on Etsy here. Thanks so much, as every little bit allows me to continue blogging and designing and sharing!
I'm off to work on another colorful pattern. Happy Hooking to YOU!
| On the Board | -- Try and keep on trying until that which seems difficult becomes possible and that which seems only possible becomes habit and a real part of you. ~~Dieter F. Uchtdorf

Related Posts

YARN 8 Book-a-Zine: How to Make Felted Mitts
Prism Pillow Crochet Pattern