
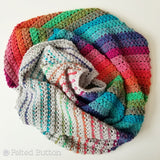
5th Dimension Scarf -- Free Crochet Pattern
The 5th Dimension Blanket CAL is now underway as folks are busy gathering materials and working out their gauge. I decided it might be fun to share "one dimension" of the pattern with you. See, when I was designing the blanket in panels, the first one I made magically made its own little scarf design.

 But I think it makes a fabulous scarf on its own! Nifty when things like that happen, huh? If you are interested in joining the 5D Blanket CAL, don't worry that you might be behind. It's never too late to start as it's a pretty laid-back crochet-a-long and although has a schedule, it will run indefinitely in my Facebook Group here where you can find support from others who are doing it. (Just click Join and I'll add you to the group.) You can read all about the blanket CAL--find the pattern, yarn requirements, and schedule--here.

So how to make the scarf? Let's get on with the pattern...
I rated it as intermediate only because it involves an interesting little stitch, the herringbone half double crochet and also a foundation row of that stitch. By the way, this pattern is written in US terms. Phew--I'd hate to have you guessing on that one.
You'll need a 4mm hook (gauge isn't critical with this one) and 22 colors of DK yarn. I used one of each color of Scheepjes River Washed* for my blanket, but now I'm thinking that a Colour Pack of Scheepjes River Washed/Stone Washed* might be brilliant for this baby, too. Have you seen it?

You could really have fun with color with that little box of cuties, I think!
Here are the colors of River Washed I used:
You might not be familiar with the herringbone half-double crochet (hhdc). It's very simple. You work it like this:
If you are still having trouble with it, Moogly has a quick and clear video here.


Now notice the new yarn pulling up from below marked by the white X. If you continue working in the regular fashion, you'll be left with these funny "carries" of yarn that I don' think look so tidy. Here's how to fix it...


Easy peasy, huh? Getting your rhythm with the hhdc takes a little time. One caution is to not pull too tightly when you pull that first drawn loop through the first loop on your hook. Since it is akin to a sl st, some folks are tempted to make it too tight. Relax and enjoy the flow! Think loosey-goosey!
Weave in your ends and block your scarf, if you wish. I like to block on my ironing board like I share in this post. I suppose you could add poms or tassels for a little extra fun, too! Have fun with it!

If you are interested in a clean and tidy, easier to print PDF, you can find it on Felted Button here or Etsy here for a small fee. Also, even if you have decided not to do the 5D Blanket, you can join my Facebook group to work your scarf along with others making Part 1 of the blanket CAL--the panel that becomes this scarf (or vice versa). ;)
I'm heading off to sit by the fire with my pup and my cozy blanket. Watch for a new pattern release next week--something ultra-textured and feminine with a traditional twist.
| On the Board | -- Don't stumble over things behind you.
 * This post contains affiliate links. If you purchase through them it costs you no more but provides me a small commission which allows me to continue providing free patterns and blogging. Thanks!

See how it became part of the 5th Dimension Blanket?


So how to make the scarf? Let's get on with the pattern...
I rated it as intermediate only because it involves an interesting little stitch, the herringbone half double crochet and also a foundation row of that stitch. By the way, this pattern is written in US terms. Phew--I'd hate to have you guessing on that one.
You'll need a 4mm hook (gauge isn't critical with this one) and 22 colors of DK yarn. I used one of each color of Scheepjes River Washed* for my blanket, but now I'm thinking that a Colour Pack of Scheepjes River Washed/Stone Washed* might be brilliant for this baby, too. Have you seen it?
You could really have fun with color with that little box of cuties, I think!
Here are the colors of River Washed I used:
|
Color
|
Color
|
|
A. Ural #955
|
L. Mersey #961
|
|
B. Narmada #962
|
M. Nile #944
|
|
C. Po #955
|
N. Seine #947
|
|
D. Amazon #951
|
O. Avon #956
|
|
E. Congo #954
|
P. Mississippi #946
|
|
F. Tiber #958
|
Q. Mekong #943
|
|
G. Danube #948
|
R. Ganges #945
|
|
H. Wheaton #950
|
S. Eisack #957
|
|
I. Rhine #952
|
T. Steenbras #942
|
|
J. Severn #953
|
U. Colorado #941
|
|
K. Murray #960
|
V. Yarra #949
|
You can get your Scheepjes River Washed (78% Cotton/22% Acrylic; 1.75oz/50g; 142yds/130m) and Scheepjes Colour Crafter (100% Premium Acrylic; 3.5oz/100g; 328yds/300m (Color W—Weert, #101) from several places that all ship internationally:
Wool Warehouse (UK)*
Deramores (UK)*
Knotty House (CA)*
Black Sheep Wools (UK)*
or your local stockists: here
Now some notes about the pattern:
• Ch1 at the beginning of a row does not count as a stitch.
• Changing colors occurs on the final yarn over and pull through of the stitch. Following the instructions, drop or fasten off the old color and continue working with the new color. (Be sure to take a peek at the pics below for a suggestion for tidy color changes.) Regarding colors used...since I didn't plan a color scheme and just chose yarn colors randomly, I didn't count stitches and haven't provided a layout. This is about artistic expression and if the yarns look pretty together, they will look pretty together in your scarf. Besides, who wants to count over 3,000 stitches if you don't need to? Crochet is supposed to be fun!!
• Scarf length can by altered by adjusting the number of stitches of the foundation row. Scarf width can be altered by adjusting the number of repeat rows. My scarf measured
52.5” x 8.5” (133cm X 22cm) which is a pretty good length for me and I'm 5'8" (172cm) tall.
These are the abbreviations that I used...and remember, these are US terms.
|
BLO
|
Back Loop Only
|
sk
|
skip
|
|
ch(s)
|
chain(s)
|
sl st
|
slip stitch
|
|
fhhdc
|
foundation herringbone hdc (see Special Stitches)
|
sp
|
space
|
|
hhdc
|
herringbone half double crochet (see Special Stitches)
|
st(s)
|
stitch(es)
|
|
FLO
|
Front Loop Only
|
WS
|
wrong side
|
|
rep(s)
|
repeat(s)
|
yo
|
yarn over
|
|
RS
|
right side
|
You might not be familiar with the herringbone half-double crochet (hhdc). It's very simple. You work it like this:
- yo, insert hook in next designated st, yo and draw through st and first loop on hook, yo and draw through both loops on hook
If you're not familiar with foundation stitches, they are a way to build your first row without a foundation chain. For this design, since you are changing colors across your first row, I didn't want to see a different colored chain than the stitches, and didn't want to change the color in the starting chain, so the foundation herringbone half double crochet (fhhdc) made the most sense. Here's how to do it:
- ch 2, yo, insert hook in first ch, yo and pull up loop, (yo, pull through 2 loops) twice, (first fhhdc made), *yo, insert hook under two loops on bottom of st just made, yo and pull up loop, (yo and pull through 2 loops) twice; rep from * across to designated number of stitches
If you are still having trouble with it, Moogly has a quick and clear video here.
Scarf Pattern:
Note: Using colors A-W with 5-8 colors being used per stripe (each stripe being composed of 2 rows) and changing colors randomly across, begin with any color for the foundation row. Remember the goal is to make each little colored section vary in length with no two "stripes" being exactly the same.
Foundation Row: Complete fhhdc for 245 sts across, changing color 5-8 times as desired randomly across row—do not fasten off each new color as you will pick these back up on the returning row.
Row 1: ch1, working in FLO, hhdc in each st, fastening off after each color change across, turn. [245 hhdc]
Row 2 (RS): ch1, working in BLO, hhdc in each st across, changing colors 5-8 times randomly across and without cutting yarn but dropping old color to WS and continuing with new color, turn.
I'm going to jump in here with some pictures of how to make these color changes a bit tidier.

When it's time to drop the old color (here the blue one) work to the last part of your hhdc (or final yarn over of the last stitch of the old color). Then yarn over with the new color (red here).

Now notice the new yarn pulling up from below marked by the white X. If you continue working in the regular fashion, you'll be left with these funny "carries" of yarn that I don' think look so tidy. Here's how to fix it...

Before you begin your next st, insert your hook under that "carry" as shown above.

Then insert your hook into the next stitch like you normally would.

Yarn over and draw through both the stitch and the "carry". This pulls the "carry towards the new cikir and locks it in so it's not a loose loop.

Finish your stitch as you normally would and the "carry" is held right up there with the bottom of the stitch. Ta-dah!!
Row 3: ch1, working in FLO, hhdc in each st across, changing colors 5-8 times randomly across fastening off old color and picking up new color
Rep Rows 2-3 until there are 13 stripes or until piece measures 8.5” (21.5cm) ending on Row 2 rep.
Weave ends and block, as desired.
Easy peasy, huh? Getting your rhythm with the hhdc takes a little time. One caution is to not pull too tightly when you pull that first drawn loop through the first loop on your hook. Since it is akin to a sl st, some folks are tempted to make it too tight. Relax and enjoy the flow! Think loosey-goosey!
Weave in your ends and block your scarf, if you wish. I like to block on my ironing board like I share in this post. I suppose you could add poms or tassels for a little extra fun, too! Have fun with it!

If you are interested in a clean and tidy, easier to print PDF, you can find it on Felted Button here or Etsy here for a small fee. Also, even if you have decided not to do the 5D Blanket, you can join my Facebook group to work your scarf along with others making Part 1 of the blanket CAL--the panel that becomes this scarf (or vice versa). ;)
I'm heading off to sit by the fire with my pup and my cozy blanket. Watch for a new pattern release next week--something ultra-textured and feminine with a traditional twist.
| On the Board | -- Don't stumble over things behind you.

Related Posts
Elan Blanket Crochet Pattern
Go ahead. Ask me how many works-in-progress I have right now. Guess what? I'm not going to admit how many there are. ...
Read More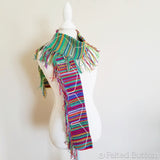
Neighborhood Scarf Free Crochet Pattern
Today is free pattern day! Below is the free crochet tutorial for my Neighborhood Scarf which I introduced and explai...
Read More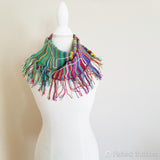
Neighborhood Scarf Reveal -- In Honor of Mr. Rogers
Last week I teased you with some unusual photos from my latest creation. And then I began a story that I'm going to f...
Read More