
Free Border Pattern from Every Which Way Crochet
If you read my review of the new book by Edie Eckman (Every Which Way Crochet Borders), you'll know that I love it! If you missed it, read more about it here. I'm also able to share with you a FREE pattern from the book!! Nifty, huh?

I love the graphic nature of the circles (rondels) on the border and think it could add such a unique look. Clean and simple is good.
Pattern #52
(US Terms)
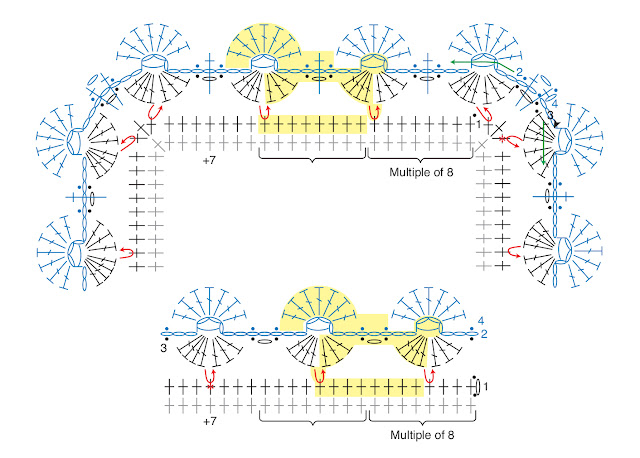
Stitches & Notes: The construction of this border is interesting and unusual. Rnd 1 is straightforward; Rnd 2 in a separate piece that serves as the foundation for the rondels that will be worked in Rnds 3 and 4. Rnd 3 is worked in a join-as-you-go method to Rnd 1. Rnds 2-4 should be worked in the same color. Don't try to think ahead or guess what's going on, but take your time to follow the written instructions step-by-step, and you'll do fine!
Flat join: Drop loop from hook, insert hook from front to back through st or space indicated, place loop back on hook and pull through to front.
Base Rnd, each side: Multiples of 8 + 7 + corners
Begin in any st.
Rnd 1: Standing sc in first sc, sc in each sc around, placing 3 sc in each corner st, join with sl st to first sc.
Fasten off.
To plan for Rnd 2, follow these steps:
Rnd 3: 4 dc in next ring; holding main fabric (Rnd 1) so that the right side is facing and is above the current rnd,flat join to marked st, *[3 dc in same ring, skip 2 ch, sl st in next ch, ch 1, sk 1 ch, sl st in next ch, 4 dc in next ring**, sk 7 Rnd-1 sts, flat join in next st] to corner st, rep from * to ** once, sk corner st, flat join in next st; rep from * around, ending last rep with 3 dc in last ring, sk 2 ch, sl st in next ch, ch 1, sk 1 ch, join with sl st in first dc, turn.
Rnd 4: Ch 1, (sc, ch 1, sc) over both ch-spaces of Rnd 2 and Rnd 3 together, sl st in next ch of Rnd 3, *7 dc in next ring to complete rondel, [sk 2 ch, sl st in next ch**, sc over both ch-spaces of Rnd 2 and Rnd 3 together, sl st in next ch, 7 dc in next ring] to corner, sk 2 ch, sl st in same ch as Rnd-3 sl st, (sc, ch 1, sc) over both corner ch-spaces of Rnd 2 and Rnd 3 together; rep from * around, ending last rep at **, join with sl st to first sc. Fasten off.
There you go!! I hope you feel inspired to add this unique border to your next project!
Stay in the "Button Loop" and enjoy the yarny happenings on my Facebook page here, Instagram here or Pinterest here.
| On the Board | -- The first, middle and the last thing to do is pray.
~~Henry B. Eyring


Remember, each of the 139 patterns in the book is unique and includes a color photograph, written instructions, a crochet symbol chart, and explanations of any special stitches right there on the page. Here's a really cool one right from the book...
 |
| Excerpt from Every Which Way Crochet Borders (C) 2017 by Edith L. Eckman. Photography by John Polak. Charts by Karen Manthey. Pattern, chart and imagery used with permission from Storey Publishing. |
Pattern #52
(US Terms)
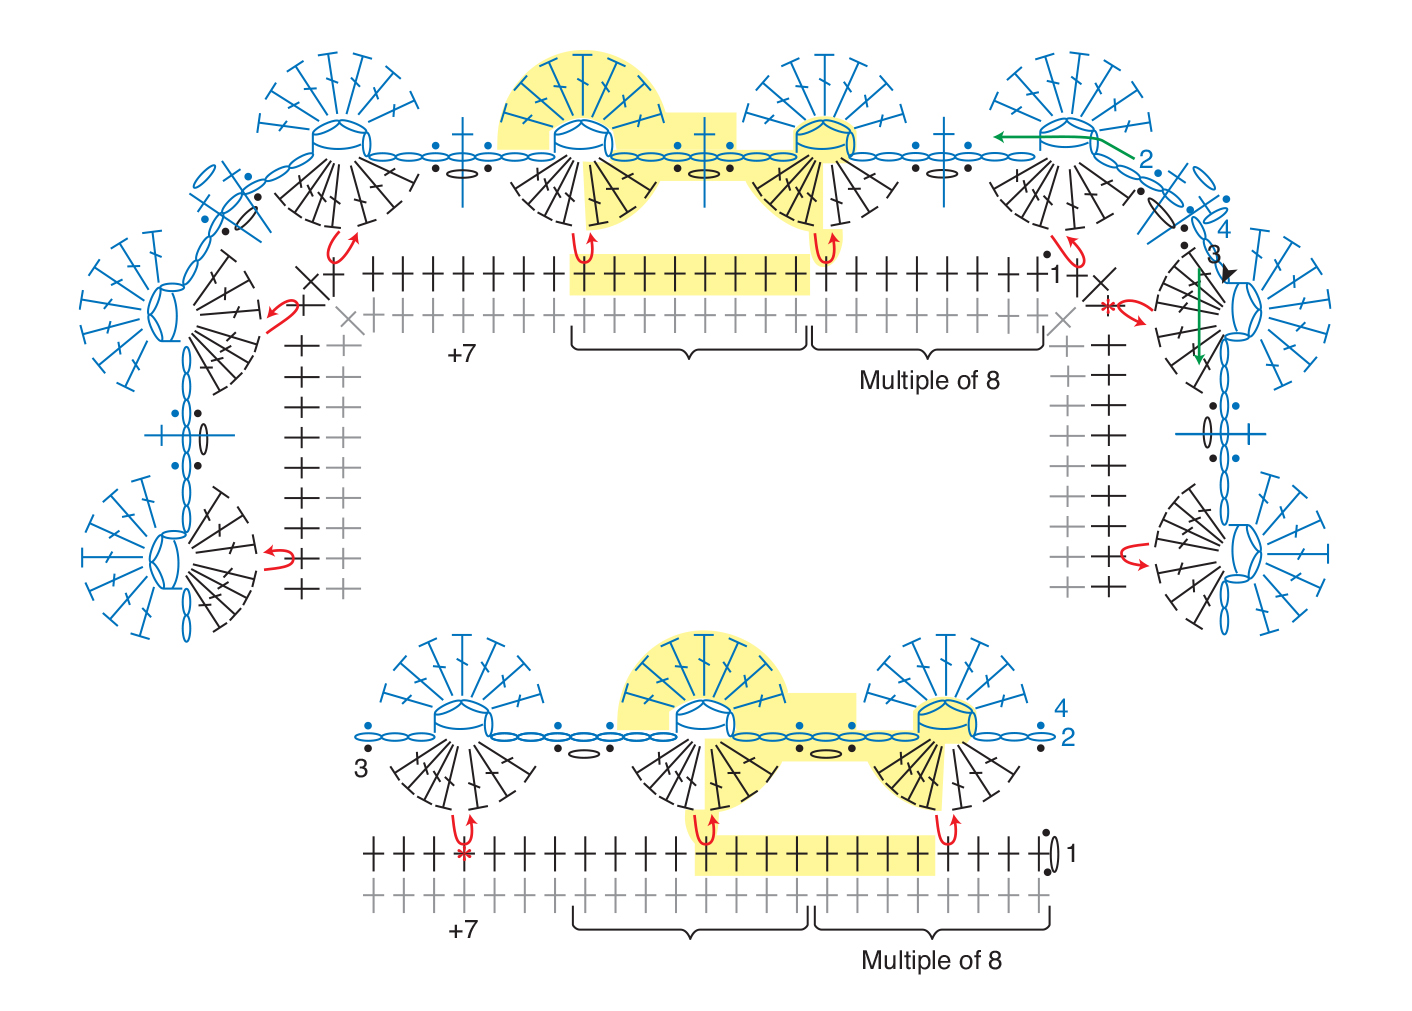
Stitches & Notes: The construction of this border is interesting and unusual. Rnd 1 is straightforward; Rnd 2 in a separate piece that serves as the foundation for the rondels that will be worked in Rnds 3 and 4. Rnd 3 is worked in a join-as-you-go method to Rnd 1. Rnds 2-4 should be worked in the same color. Don't try to think ahead or guess what's going on, but take your time to follow the written instructions step-by-step, and you'll do fine!
Flat join: Drop loop from hook, insert hook from front to back through st or space indicated, place loop back on hook and pull through to front.
Base Rnd, each side: Multiples of 8 + 7 + corners
Begin in any st.
Rnd 1: Standing sc in first sc, sc in each sc around, placing 3 sc in each corner st, join with sl st to first sc.
Fasten off.
To plan for Rnd 2, follow these steps:
- Place marker in ninth st after any corner st.
- Calculate the number of repeats you'll need to work in the next rnd, as follows:
- For each side, after Rnd 1:
- {(Number of sts on side, excluding corner sts - 1) + 8] + 1 = number of repeats for one sie
- Total the numbers of repeats for all sides - 1 = X
- X is the number you'll need to plug in on Rnd 2.
Rnd 3: 4 dc in next ring; holding main fabric (Rnd 1) so that the right side is facing and is above the current rnd,flat join to marked st, *[3 dc in same ring, skip 2 ch, sl st in next ch, ch 1, sk 1 ch, sl st in next ch, 4 dc in next ring**, sk 7 Rnd-1 sts, flat join in next st] to corner st, rep from * to ** once, sk corner st, flat join in next st; rep from * around, ending last rep with 3 dc in last ring, sk 2 ch, sl st in next ch, ch 1, sk 1 ch, join with sl st in first dc, turn.
Rnd 4: Ch 1, (sc, ch 1, sc) over both ch-spaces of Rnd 2 and Rnd 3 together, sl st in next ch of Rnd 3, *7 dc in next ring to complete rondel, [sk 2 ch, sl st in next ch**, sc over both ch-spaces of Rnd 2 and Rnd 3 together, sl st in next ch, 7 dc in next ring] to corner, sk 2 ch, sl st in same ch as Rnd-3 sl st, (sc, ch 1, sc) over both corner ch-spaces of Rnd 2 and Rnd 3 together; rep from * around, ending last rep at **, join with sl st to first sc. Fasten off.
There you go!! I hope you feel inspired to add this unique border to your next project!
Stay in the "Button Loop" and enjoy the yarny happenings on my Facebook page here, Instagram here or Pinterest here.
| On the Board | -- The first, middle and the last thing to do is pray.
~~Henry B. Eyring

Related Posts

YARN 8 Book-a-Zine: How to Make Felted Mitts
Ever since discovering the magic of felting, I'm honestly gleeful when I get to create anything with the technique. R...
Read More
Prism Pillow Crochet Pattern
You know when you are finished with a project and are left with the few bits of leftover yarn--and those leftovers ar...
Read More
Free Crochet Pattern | Rinske Square
Let me introduce you to my latest free crochet granny square I've named Rinske. I've partnered with the talented Juli...
Read More